

You know that moment when cinnamon buns come out of the oven?
That warm, spiced smell that wraps around your whole kitchen like a hug?
Yeah. That’s what we’re making today.
And here’s the best part – these are completely vegan. No dairy. No eggs. Just soft, pillowy buns that’ll make you wonder why you ever bought the store-bought kind.
I’ve made these so many times I could probably do it in my sleep. And I’m going to show you exactly how I do it.
Recipe Timing:
Prep Time: 15 minutes | Cook Time: 20 minutes | Rising Time: 2 hours | Total Time: 2 hours 35 minutes
Servings: 12 buns | Difficulty: Moderate
My Take on Sticky Buns
Let me be honest with you.
Traditional sticky buns? The ones from Pennsylvania that everyone raves about?
They’re baked upside-down with nuts and caramel, then you flip them over and… well, they look kind of messy. Squashed. Not Instagram-worthy at all.
So I did something different.
I made classic swirled cinnamon rolls and then drowned them in this incredible maple glaze. The spirals stay gorgeous. The glaze soaks in and keeps everything moist. And they actually look as good as they taste.
Win-win-win.
Why This Recipe Works
Look, I’m all about keeping things simple.
You don’t need fancy equipment. No bread machine. No special ingredients you can only find at that one store across town.
Everything goes into one bowl. Less cleanup. More time for eating warm cinnamon buns.
The dough? Super forgiving.
Even if this is your first time making yeast bread, you’ve got this. I’ll walk you through the whole thing. Step by step. No confusing baker talk.
What You’ll Actually Need
Let me break this down into three parts:
The Dough
This is where the magic happens. You’re using stuff you probably already have:
All-purpose flour – This creates that perfect soft texture we’re after.
Plant-based milk – I use oat or soy. Just warm it up a bit. Not hot. Warm.
Vegan butter – This is what makes these buns rich and tender. Room temperature is key here.
Sugar – Just a touch. This feeds the yeast so they can do their thing.
Instant yeast – No activation needed. Just dump it in.
Cinnamon – Even in the dough itself. Because why not?
The Filling
This part is beautifully simple:
Melted vegan butter. Brown sugar. More cinnamon.
That’s it.
I don’t hold back on the filling. That’s what makes these buns special.
The Maple Glaze
This is what takes good buns and makes them absolutely incredible.
Pure maple syrup – Don’t cheap out here. Get the real stuff.
A bit of sugar – Helps thicken everything up.
Coconut cream (optional) – Want it extra luxurious? Add this.
Can I Swap Things Out?
Short answer? Yes.
Here’s what I’ve tested:
Flour alternatives:
- White spelt works
- Whole wheat works
- Both will make denser buns (still good, just heartier)
Gluten-free? I haven’t had luck with it. But different brands behave differently, so maybe yours will work.
Out of vegan butter?
Oil works. Your buns won’t be quite as fluffy. But they’ll still taste good.
Sugar swaps:
Coconut sugar works throughout the whole recipe. It adds this nice caramel-y flavor.
For the glaze, agave or golden syrup can replace the maple syrup.
Your Complete Shopping List
Here’s everything laid out:
| Ingredient | Quantity | What It Does | Important Notes |
|---|---|---|---|
| All-purpose flour | 3¼ cups (405g) | Creates the bun structure | Grab extra for dusting |
| Plant-based milk | 1 cup (250g) | Brings dough together | Should be warm, not hot |
| Vegan butter | ½ cup (115g) | Makes buns rich | Must be room temp |
| Granulated sugar | 3 tbsp (40g) | Feeds the yeast | Coconut sugar works too |
| Instant yeast | 1 tbsp (9g) | Makes buns rise | Has to be instant type |
| Ground cinnamon | 1 tsp | Adds warmth | We’ll use more later |
| Salt | 1 pinch | Brings out flavor | Skip if your butter’s salted |
| Vegan butter (melted) | 2 tbsp (30g) | Goes on dough | For brushing |
| Brown sugar | ¼ cup (50g) | Sweetens filling | Pack it down when measuring |
| Ground cinnamon | 1 tbsp | Main filling flavor | This is important |
| Maple syrup | ¼ cup (85g) | Glaze base | Pure maple is best |
| Granulated sugar | ¼ cup (50g) | Thickens glaze | Helps it stick |
| Vegan butter | 1 tbsp (15g) | Makes glaze glossy | Final touch |
| Coconut cream | 1 tbsp (15g) | Extra richness | Optional but amazing |
Let’s Make Some Buns
Step 1: The Dough
First things first.
Get everything out and ready. Trust me on this. When you’re in the middle of kneading, you don’t want to be hunting for the cinnamon.
Dump your flour, warm milk, room-temp butter, sugar, yeast, cinnamon, and salt into a big mixing bowl.
Got a stand mixer? Use it.
Don’t have one? A wooden spoon works just fine. Your arm might get tired, but you’ll survive.
Mix it all together.
It’ll look shaggy at first. That’s normal.
Now knead for 5-7 minutes.
You’re looking for smooth, elastic dough. When you poke it, it should spring back. It should feel a little tacky. But not wet and sticky.
Here’s What I Learned the Hard Way
Every flour brand is different.
Some soak up more liquid. Some need less.
So your dough might need tweaking.
Too dry and crumbly?
Add milk. One tablespoon at a time. Work it in before adding more.
The dough will fight you at first. But it’ll come around.
Too wet and sticky?
Sprinkle in flour. Gradually. Just until it stops sticking to the bowl.
Step 2: First Rise
Move your dough to a clean bowl. Grease it a little first.
Cover with a damp kitchen towel.
Why damp? It stops the dough from getting a crusty skin on top.
Now find the warmest spot in your house.
My favorites:
- Oven with just the light on
- Sunny window (not direct sun though)
- Near a radiator in winter
Let it sit for at least an hour.
It needs to double in size.
Cold kitchen? Might take 90 minutes.
Be patient. Don’t rush this.
If it’s been an hour and nothing’s happening?
Move it somewhere warmer. Temperature is everything with yeast.
Step 3: Shape Time
Punch down your risen dough. Gently.
Turn it out onto a floured surface. Flour your rolling pin too.
Roll it into a rectangle. Roughly 16 by 12 inches.
Try to keep it even.
Now the fun part starts.
Brush that melted butter everywhere. And I mean everywhere. Right to the edges.
Why? Because every single bite deserves to be good.
Mix your brown sugar and cinnamon in a small bowl.
Sprinkle it over the butter. Generously.
Now use your fingers. Press it gently into the butter.
This stops it from falling out when you roll everything up.
Starting from the long edge near you, roll the dough tight.
Keep the tension even. You want a nice compact log.

Cutting Your Rolls
Here’s my trick:
Use a sharp knife. Or unflavored dental floss.
(Dental floss is honestly better. It doesn’t squash the rolls.)
Mark the halfway point first. Then quarters.
This gives you even portions.
Cut twelve pieces total.
Grease your 9×13 inch pan.
Now arrange your rolls. You’ve got options here:
Close together? You’ll get soft, pillowy edges.
Spaced apart? Slightly crispier sides.
Both are good. Your choice.
Cover with a towel.
Let them rise another hour. They should get puffy. Almost doubled again.
Step 4: Bake
When you’ve got about 15 minutes left on that second rise?
Preheat your oven to 350°F (180°C).
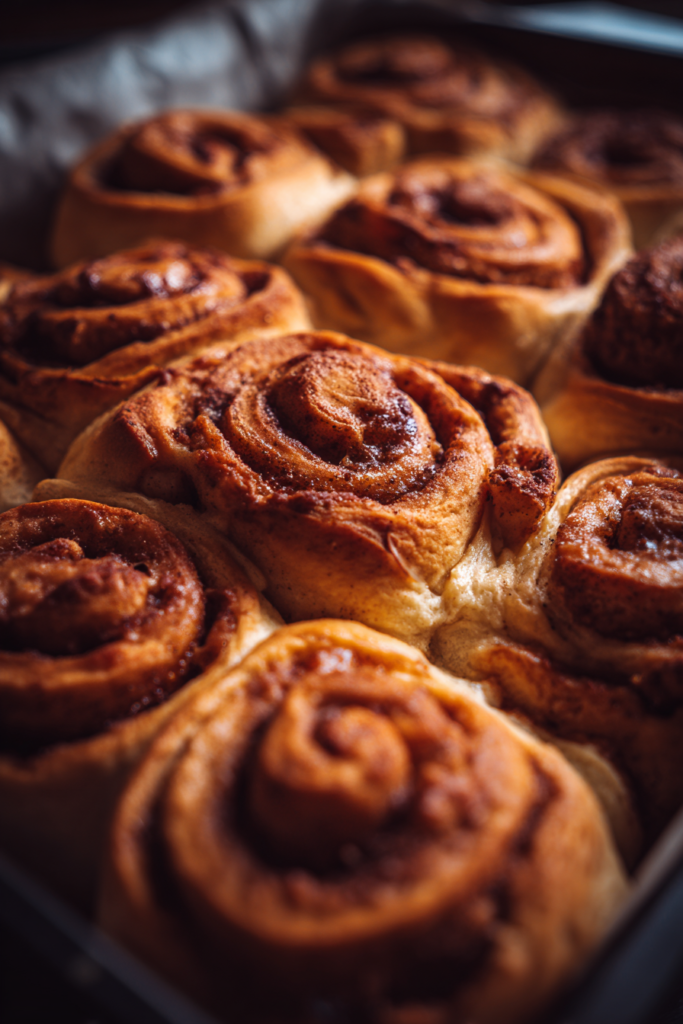
Bake for 15-20 minutes.
You’re looking for light golden color on top.
Want to test if they’re done? Stick a skewer into a center bun. Should come out clean.
The Glaze
While those buns are baking, make your glaze.
Throw maple syrup, sugar, butter, and coconut cream (if using) into a small saucepan.
Whisk over low heat.
Everything should melt together and thicken up a bit. It’ll coat the back of a spoon when it’s ready.
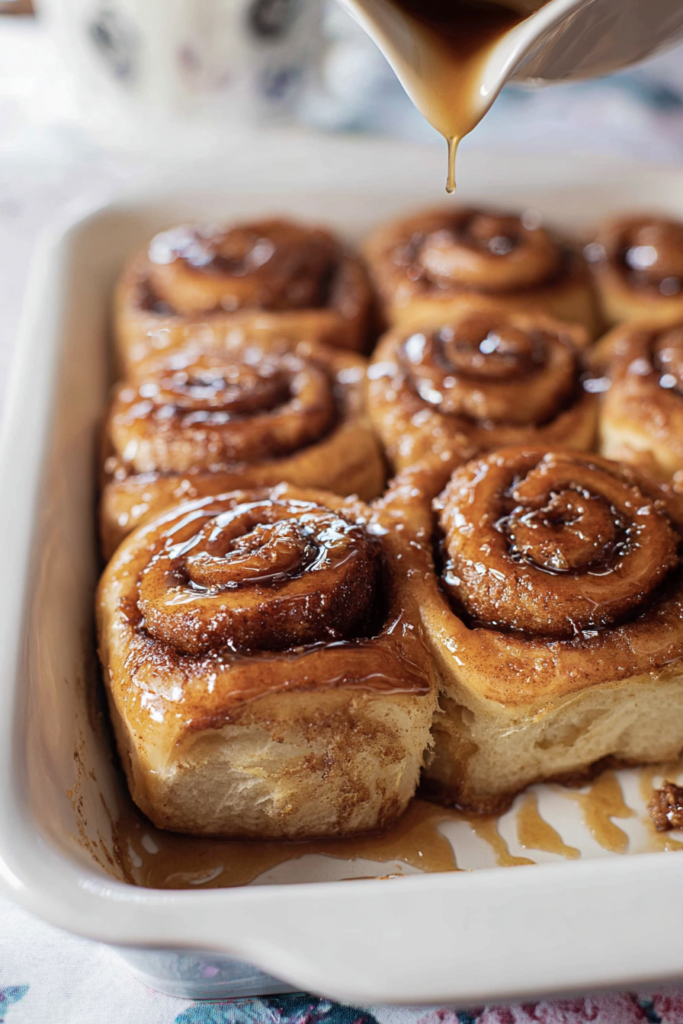
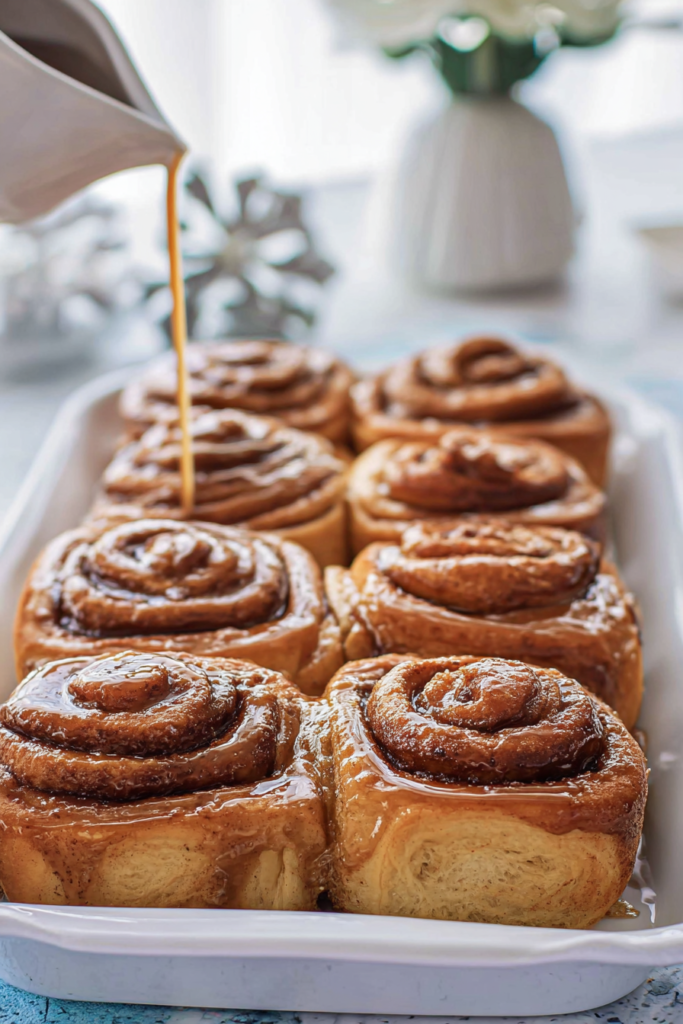
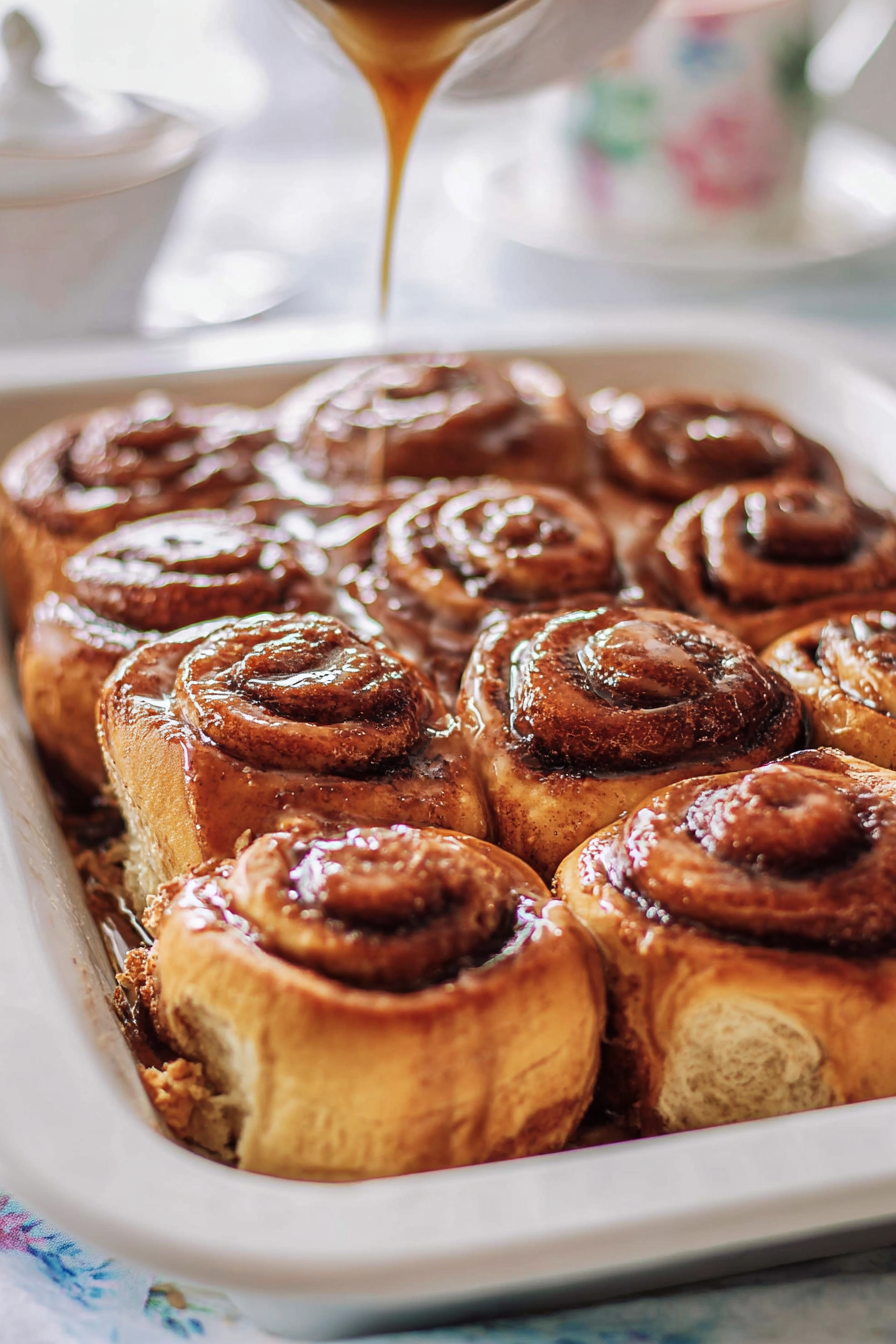
Pull your buns out of the oven.
Right away – drizzle that warm glaze over them.
The heat helps it soak in. It’s beautiful.
Wait 5-10 minutes before digging in.
I know it’s hard. But warm cinnamon buns are worth the wait.
What About Leftovers?
These taste best fresh.
But leftovers? Still great.
Keep them in an airtight container:
- Room temperature: 1-2 days
- Fridge: 3-4 days
Always reheat before eating.
Ten seconds in the microwave brings back that just-baked texture.
My Best Tips
Let me share what I’ve learned from making these about a hundred times:
Temperature Is Everything
Your milk should be warm. Not hot.
Aim for 100-110°F.
Too hot? You’ll kill the yeast.
Too cold? Everything slows way down.
Don’t Skip Rising Time
I get it. Waiting is annoying.
But this step matters. A lot.
Underproofed dough = dense, sad buns.
Properly risen dough = fluffy, amazing buns.
Roll Tight (But Not Too Tight)
You want a tight roll for those pretty swirls.
But don’t go crazy. Too aggressive and you’ll squeeze all the filling out.
The Dental Floss Trick
Seriously. Try this.
Slide the floss under your dough log. Cross the ends over the top. Pull.
Clean cuts every time. No squashed buns.
Make Them Ahead
I do this all the time for weekend brunch.
After you shape the buns, cover the pan tight with plastic wrap.
Stick it in the fridge overnight.
Skip that second rise.
Next morning, pull them out. Let them sit at room temp for 30-45 minutes while your oven heats up.
Then bake.
Want to Freeze Them?
You can freeze unbaked buns.
Shape them. Freeze on a tray until solid. Transfer to freezer bags.
When you’re ready to bake:
- Thaw overnight in the fridge
- Do the final rise
- Bake as usual
When Things Go Wrong
Because sometimes they do. Here’s how to fix it:
Dough Won’t Rise
Check your yeast first. Is it expired?
Old yeast = dead yeast = no rising.
Also make sure your spot is actually warm enough.
Buns Came Out Dense
Usually this means:
- You didn’t knead enough
- You didn’t let it rise long enough
- Both
The dough needs time to develop. Don’t rush it.
Filling Leaked Out
Two reasons this happens:
You didn’t press the cinnamon sugar into the butter enough.
Or your roll wasn’t tight enough.
Glaze Too Thin
Let it simmer longer.
The liquid needs to evaporate. The sugar needs time to dissolve and thicken things up.
Questions People Always Ask Me
Can I use active dry yeast instead of instant?
Yep. But you’ll need to activate it first.
Mix it with your warm milk and a pinch of sugar. Wait 10 minutes for it to get foamy.
Then add it to your other ingredients.
Oh, and use about 1⅓ tablespoons. Active dry isn’t as strong as instant.
How do I reheat these?
For one bun: Microwave for 10-15 seconds.
For several: Wrap in foil. Warm in a 300°F oven for 10 minutes.
This brings back that soft texture without drying them out.
Can these be frozen?
Absolutely.
Bake them completely. Let them cool. Don’t add the glaze yet.
Wrap each one in plastic wrap. Put them in freezer bags.
They’ll keep for 3 months.
To eat: Thaw at room temp. Warm them up. Then add your glaze.
Why aren’t my buns fluffy?
Could be a few things:
- Your yeast was old
- You didn’t knead enough
- You rushed the rising time
- You added too much flour
Make sure your yeast is fresh. And give the dough the time it needs.
Can I add nuts or raisins?
Go for it!
Chopped pecans or walnuts work great. Sprinkle them over the cinnamon sugar before rolling.
Raisins too.
Just don’t overdo it. You still need to be able to roll the dough.
Now go make some buns. Your kitchen is about to smell amazing.
Easy Vegan Cinnamon Buns with Maple Glaze
Ingredients
Method
- In a large mixing bowl, combine flour, warm plant-based milk, room temperature vegan butter, sugar, instant yeast, cinnamon, and salt. Mix with a stand mixer or wooden spoon until combined.
- Knead the dough for 5-7 minutes until smooth and elastic. The dough should spring back when poked and feel slightly tacky but not wet. Add milk (1 tablespoon at a time) if too dry, or flour if too sticky.
- Transfer dough to a lightly greased bowl, cover with a damp kitchen towel, and place in a warm spot. Let rise for at least 1 hour (up to 90 minutes in cold kitchens) until doubled in size.
- Gently punch down the risen dough. Turn out onto a floured surface and roll into a 16×12 inch rectangle using a floured rolling pin.
- Brush melted vegan butter evenly over the entire surface, right to the edges. Mix brown sugar and cinnamon in a small bowl, then sprinkle generously over the butter. Press gently with fingers to help it stick.
- Starting from the long edge nearest you, tightly roll the dough into a log, keeping even tension throughout.
- Using a sharp knife or unflavored dental floss, cut the log into 12 equal pieces. Arrange in a greased 9×13 inch pan, either close together for soft edges or spaced apart for slightly crispier sides.
- Cover with a towel and let rise for another hour until puffy and nearly doubled.
- Preheat oven to 350°F (180°C) during the last 15 minutes of rising time.
- Bake for 15-20 minutes until light golden on top. Test doneness by inserting a skewer into a center bun – it should come out clean.
- While buns bake, make the glaze: Combine maple syrup, sugar, vegan butter, and coconut cream (if using) in a small saucepan. Whisk over low heat until melted and thickened enough to coat the back of a spoon.
- Remove buns from oven and immediately drizzle warm glaze over them. Let rest 5-10 minutes before serving.