Author: admin@easycookingways.com

  • Easy Cinnamon Roll Cake Recipe (No Yeast Required!)

    Easy Cinnamon Roll Cake Recipe (No Yeast Required!)

    Why This Cinnamon Roll Cake Will Become Your Go-To Recipe

    So there I was, standing in my kitchen at 8 PM on a Tuesday.

    Craving cinnamon rolls like crazy.

    But the thought of kneading dough for two hours? No thanks. I had a Netflix show waiting and zero patience for yeast.

    That’s when I stumbled across this cake recipe. And honestly? It changed my entire dessert game.

    Look, this isn’t your average cake. It’s basically everything you love about cinnamon rolls packed into a simple 9×13 pan. Soft, tender cake swirled with buttery cinnamon sugar. Then topped with that sweet vanilla glaze that makes everything better.

    The best part? Under an hour from start to finish.

    I’ve baked this thing at least 30 times now. Maybe more. My family asks for it constantly. Birthdays. Potlucks. Random Sunday mornings when we’re too lazy to go out for brunch.

    Every single time, the pan comes back empty.

    cinnamon roll cake

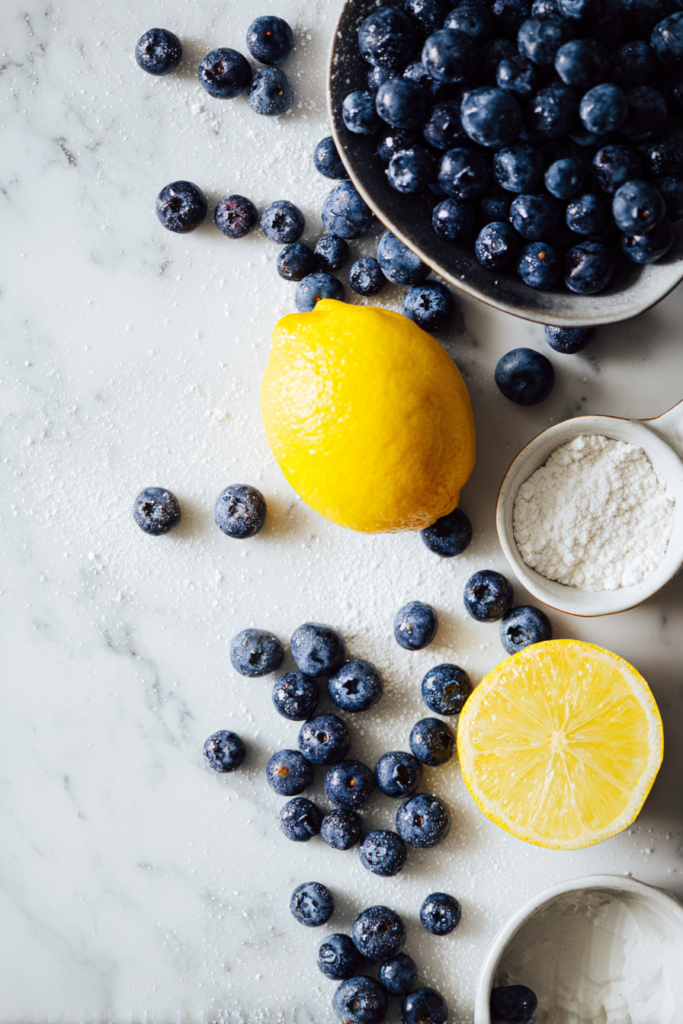
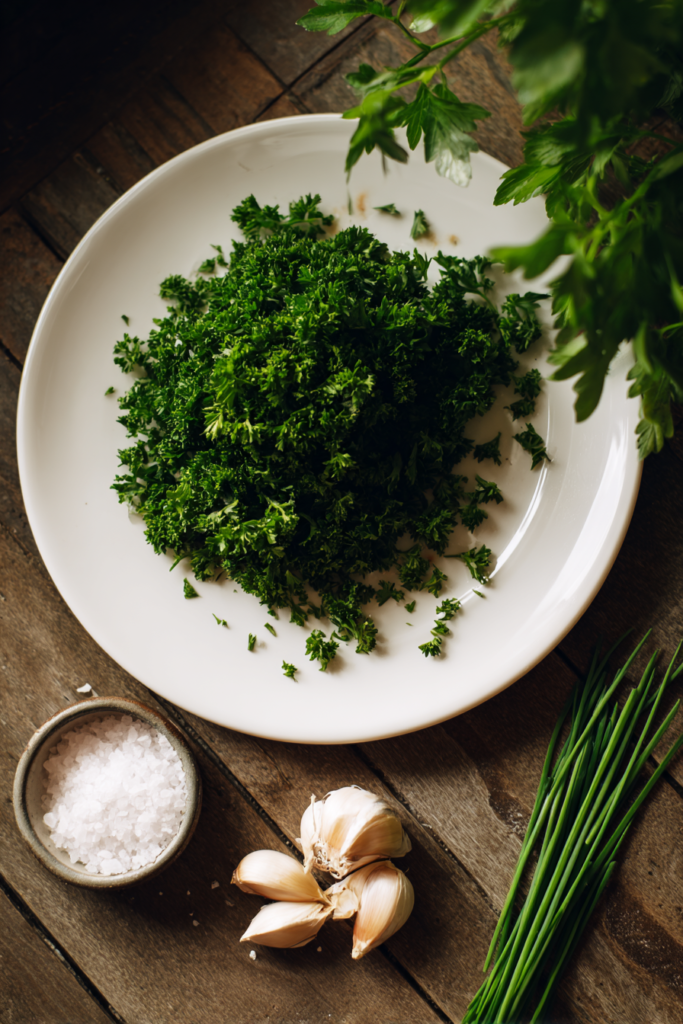
    Understanding Your Ingredients

    Let me break down what you need and why each ingredient matters.

    Because here’s the thing: baking isn’t just about throwing stuff together. Each component has a job to do.

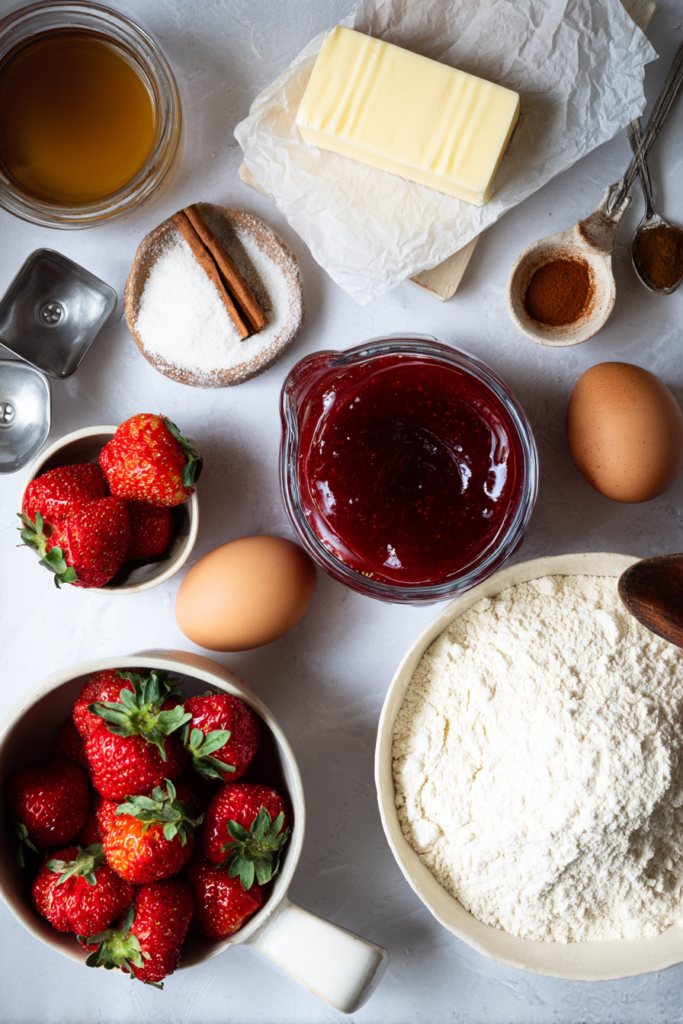
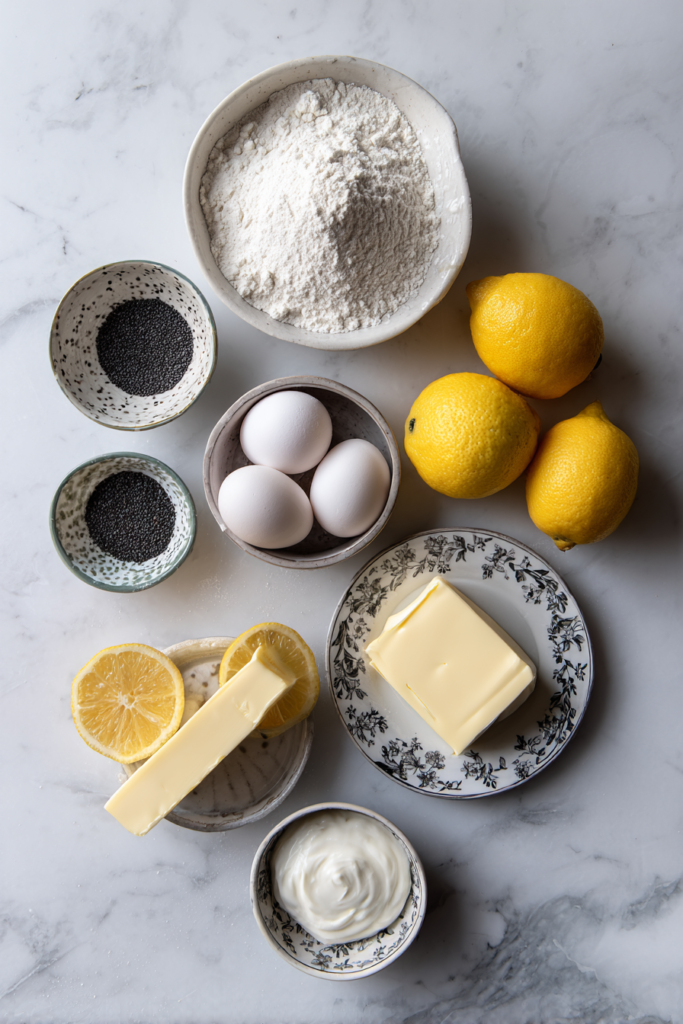
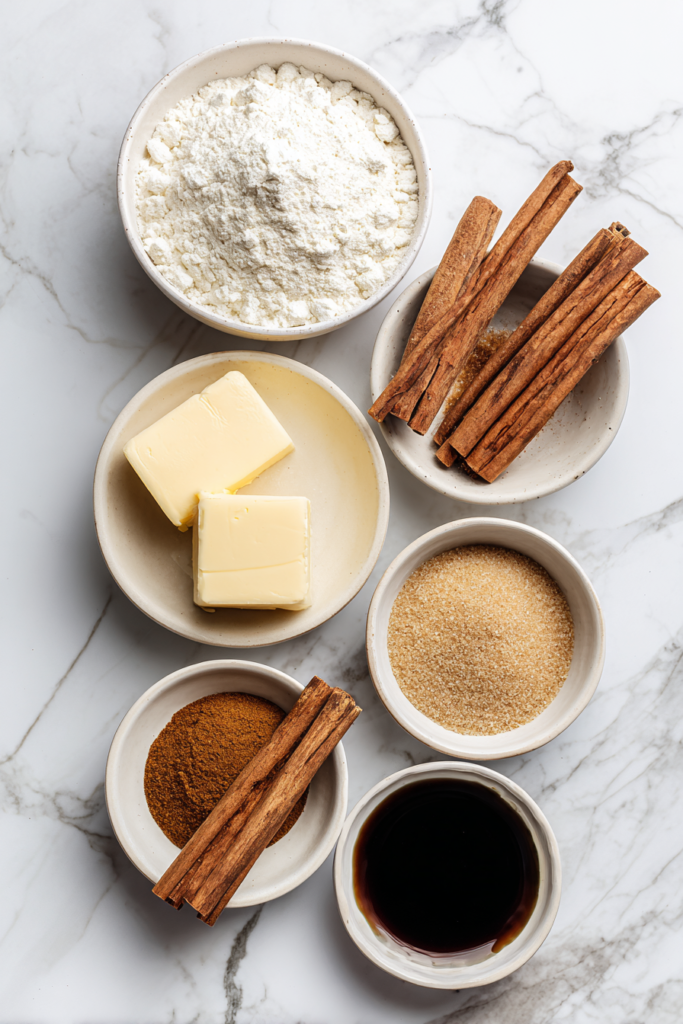
    The Cake Base Ingredients

    IngredientQuantityNotes
    All-purpose flour3 cupsDon’t pack the measuring cup; spoon it in lightly
    White granulated sugar1 cupProvides sweetness and structure
    Baking powder4 teaspoonsMust be fresh for proper rise
    Large eggs2Room temperature works best
    Vanilla extract2 teaspoonsPure vanilla gives better flavor
    Milk1½ cupsWhole milk creates richest texture
    Salted butter (melted)½ cup (1 stick)Let it cool slightly before adding

    The Cinnamon Swirl Filling

    IngredientQuantityNotes
    Salted butter (softened)¾ cup (1½ sticks)Must be room temperature
    Light brown sugar1 cupPack it firmly into measuring cup
    All-purpose flour2 tablespoonsHelps filling hold together
    Ground cinnamon1 tablespoonFresh cinnamon has stronger flavor

    The Sweet Glaze

    IngredientQuantityNotes
    Powdered sugar2 cupsSift if lumpy
    Milk5 tablespoonsAdd gradually for perfect consistency
    Vanilla extract1 teaspoonEnhances the overall flavor

    Prep Time: 10 minutes | Cook Time: 40 minutes | Total Time: 50 minutes
    Servings: 12 | Difficulty: Easy

    What I’ve Learned About These Ingredients

    After making this cake so many times, I’ve picked up a few tricks.

    Flour measurement is everything. I used to just scoop my measuring cup into the flour bag. Big mistake. That packs way too much flour in there, and you end up with a dense, heavy cake that nobody wants.

    Now I fluff the flour with a fork first. Then I spoon it gently into my measuring cup. Night and day difference.

    cinnamon roll cake

    Butter temperature matters more than you think. For the cake batter, your melted butter needs to be warm but not hot. Too hot and it scrambles your eggs. Not fun.

    For the filling, room temperature butter should be spreadable but not melted. I usually set mine out about an hour before I start baking. Just sitting on the counter does the trick.

    Brown sugar is different from white sugar. With brown sugar, you actually want to pack it down. Press it firmly with the back of a spoon until it holds its shape. Otherwise you won’t get the full cup measurement, and your filling won’t be sweet enough.

    Old baking powder is a cake killer. I learned this the hard way after wondering why my cake came out flat and sad-looking.

    Here’s how to test yours: Drop a teaspoon into hot water. If it bubbles like crazy, you’re good. If nothing happens? Time to buy fresh.

    Room temperature ingredients mix better. Cold eggs and milk can make your melted butter seize up into weird little lumps. I just set everything on the counter while I gather my other stuff. They warm up naturally in about 30 minutes.

    Kitchen Tools You’ll Need

    Before you dive in, grab these:

    • 9×13-inch baking dish
    • Large mixing bowl or stand mixer
    • Small mixing bowl for filling
    • Measuring cups and spoons
    • Whisk or electric mixer
    • Butter knife for swirling
    • Rubber spatula
    • Small bowl for glaze

    Trust me on this. Have everything ready before you start.

    I once spent five minutes tearing through my kitchen drawers looking for my butter knife while my batter sat there getting sad. Don’t be like past me.

    Preparing Your Workspace

    First things first: preheat your oven to 350°F.

    This gives it time to heat up properly while you mix everything. Then grab your 9×13-inch baking dish and spray it generously with nonstick cooking spray.

    I like the kind with flour already in it. But regular spray works fine too.

    cinnamon roll cake

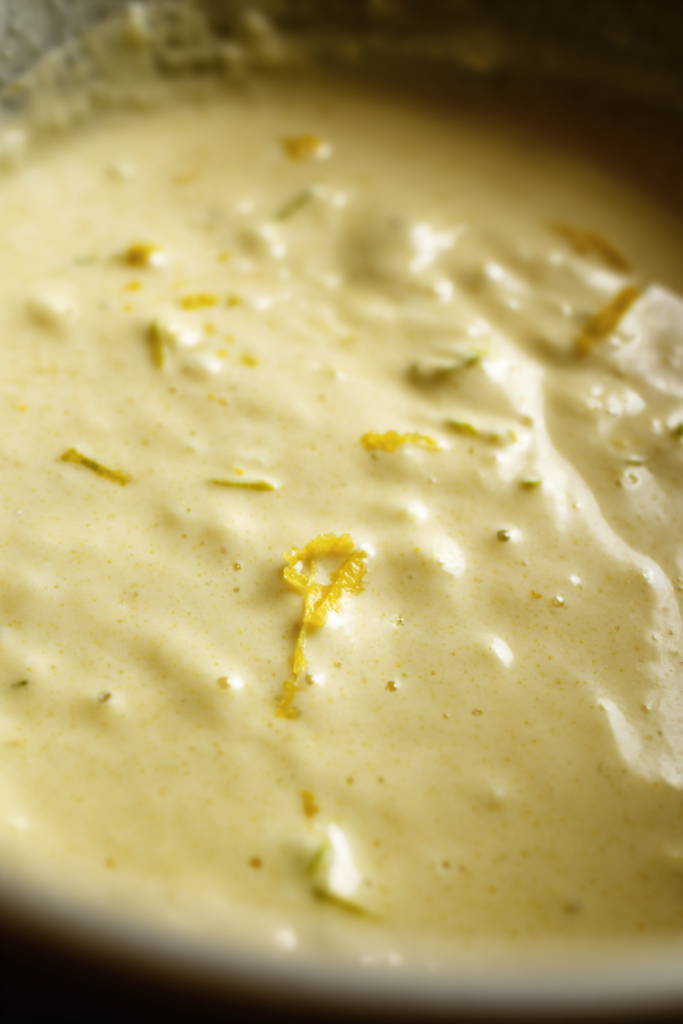
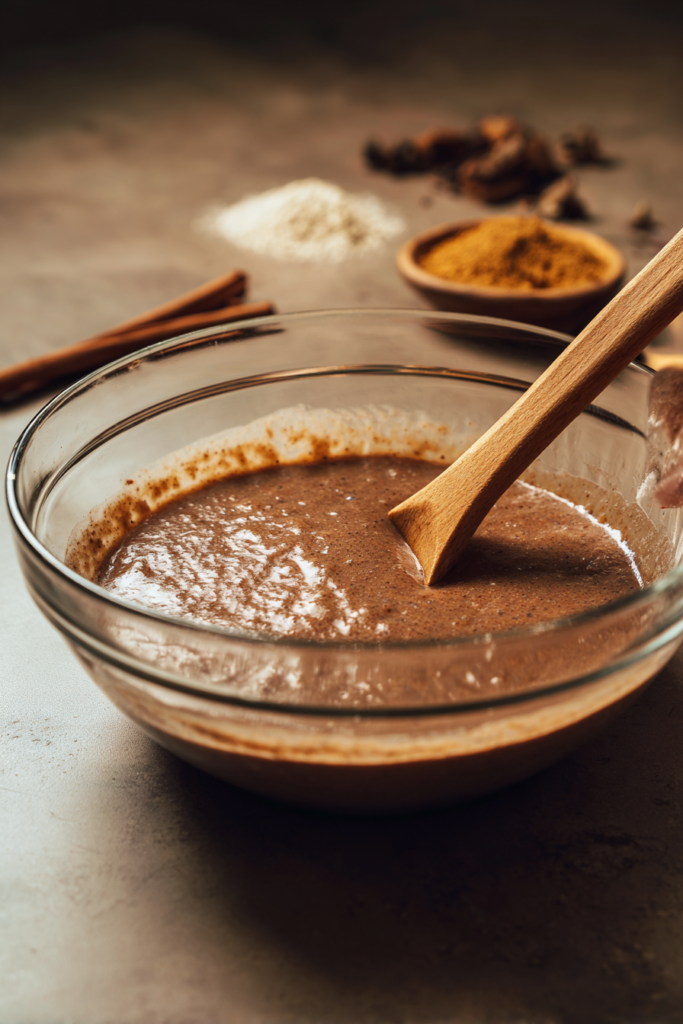
    Creating the Perfect Cake Batter

    Here’s where things get real.

    Grab your large mixing bowl. Toss in the flour, sugar, and baking powder. Give it a quick whisk to mix everything evenly. Then add your eggs, vanilla extract, and milk.

    Now comes the important part.

    With your mixer on medium-low speed, slowly drizzle in that half cup of melted butter. Go slow here. This gradual addition keeps the butter from seizing up on you. Your batter should look smooth and creamy when you’re done.

    And here’s something I wish someone had told me earlier: Stop mixing as soon as everything comes together.

    I used to overmix my batter thinking I was being thorough. Nope. That just develops too much gluten, which makes your cake tough and chewy. Nobody wants chewy cake.

    Mix just until you don’t see any more flour streaks. That’s it.

    Pour the batter into your pan. Use your spatula to spread it evenly across the bottom. Getting it level now helps everything bake uniformly later.

    Making the Cinnamon Swirl Filling

    This is the part that makes everything magical.

    In a small bowl, combine your softened butter, brown sugar, flour, and cinnamon. Use a fork or sturdy spoon to mix it all together. You want a thick, spreadable paste.

    The texture should look like thick peanut butter. If it’s too stiff, your butter was probably too cold. If it’s runny, stick it in the fridge for 10 minutes to firm up a bit.
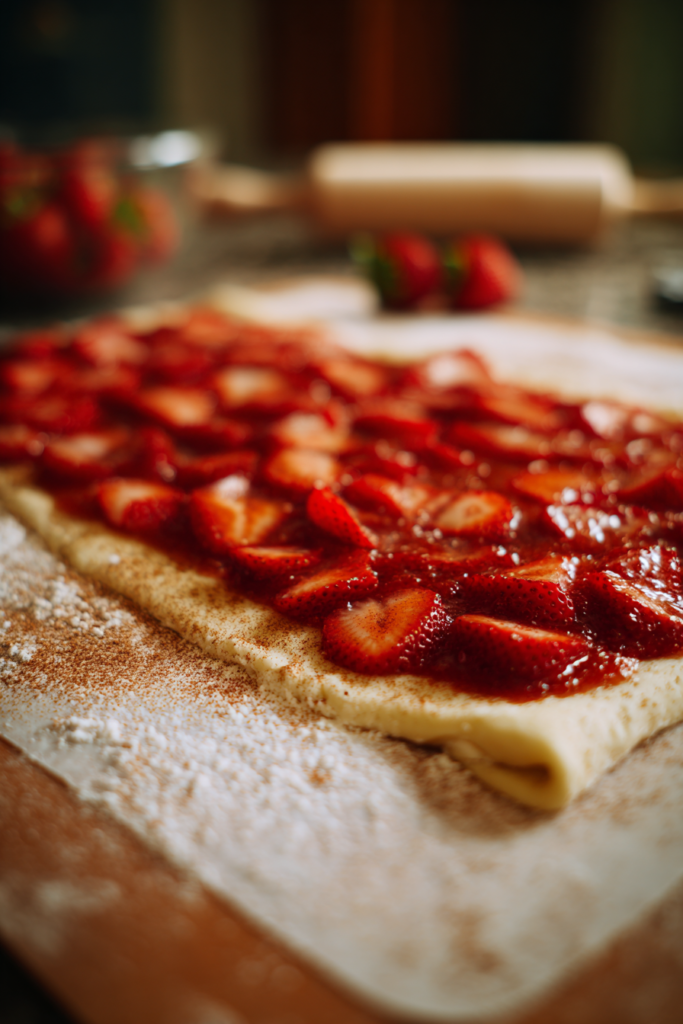
    cinnamon roll cake

    The Art of Swirling

    Okay, this is my favorite part.

    Grab a regular spoon and drop dollops of that cinnamon mixture all over your cake batter. Space them out roughly evenly. But don’t stress about perfection here.

    Now grab your butter knife.

    Start in one corner and drag the knife through both the cinnamon filling and the cake batter. Make swooping S-shapes. Figure eights. Random swirls. Whatever feels right.

    The goal? Distribute that cinnamon goodness throughout without completely blending it in.

    I used to obsess over making perfect swirls. Then I realized something: rustic looks just as good. Actually, it looks better because it’s more natural.

    Each slice will have its own unique pattern of cinnamon ribbons running through it.

    Just make sure your knife goes all the way to the bottom of the pan. That way every layer gets flavor.

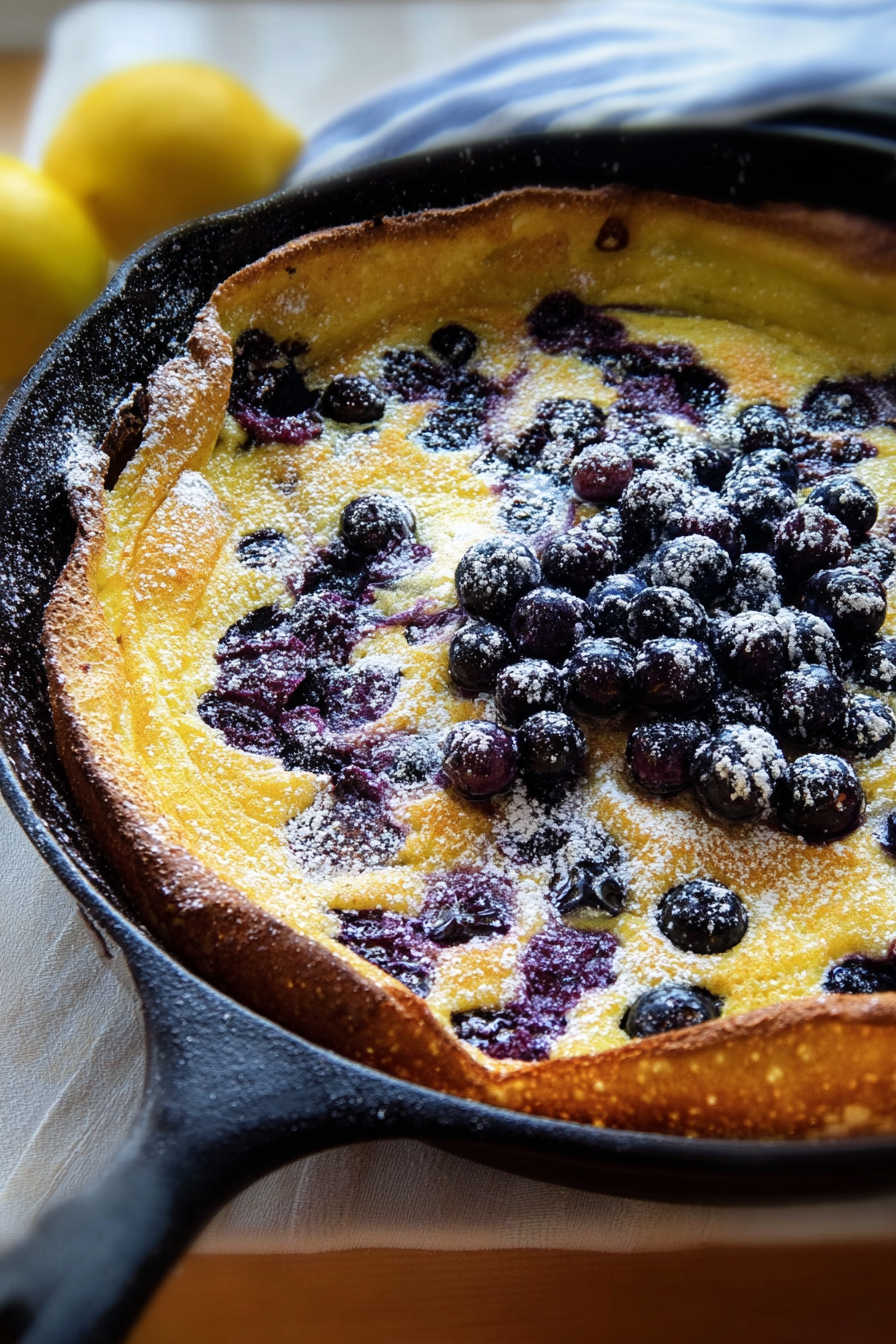
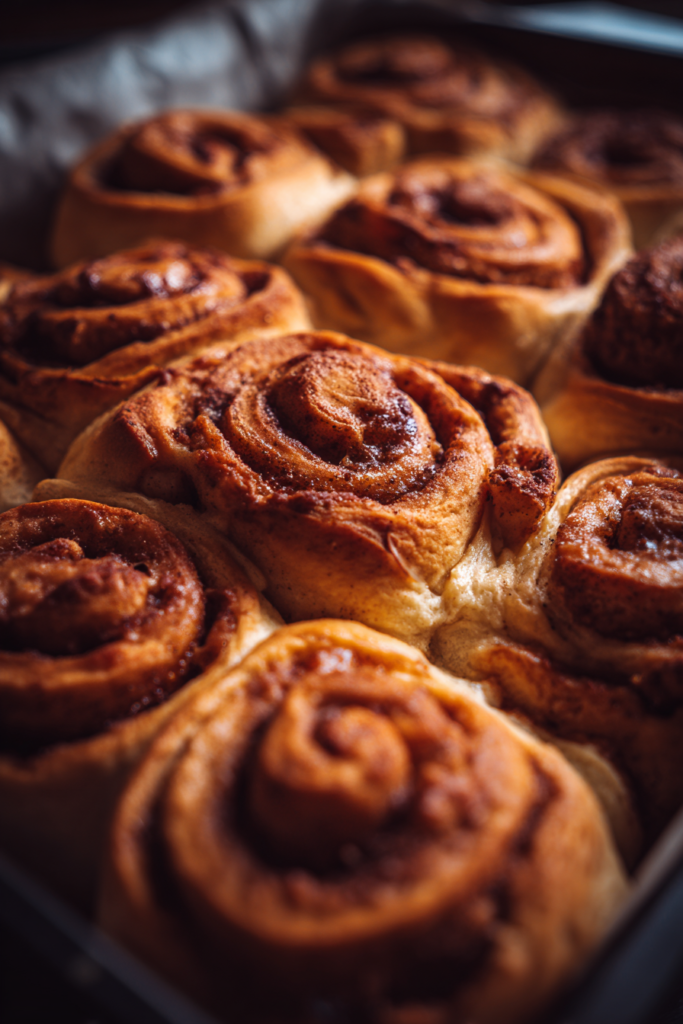
    Baking to Golden Perfection

    Slide your pan into the oven. Set your timer for 35 minutes.

    This gives you time to make the glaze while your kitchen fills with the most incredible smell. Seriously, my neighbors have actually knocked on my door asking what I’m baking.

    The cake is done when a knife stuck in the center comes out clean. Or with just a few moist crumbs clinging to it.

    In my oven, this usually takes 38-40 minutes. Yours might be different depending on your oven’s personality and what kind of pan you’re using. Glass pans sometimes take a bit longer than metal ones.

    Visual cues to watch for:

    • Edges pulling slightly away from the pan sides
    • Top looking golden brown with no wet spots
    • That amazing cinnamon smell filling your entire house

    Preparing the Vanilla Glaze

    While your cake bakes, whip up this simple glaze.

    In a small bowl, whisk together the powdered sugar, milk, and vanilla extract. Start with 5 tablespoons of milk. Add more if you want it thinner. Hold back if you prefer it thicker.

    I like mine pourable but not runny. It should drizzle off the whisk in a smooth stream. Not plop. Not gush. Just a nice, steady drizzle.

    Too thick? Add milk one teaspoon at a time.

    Too thin? Whisk in more powdered sugar gradually.
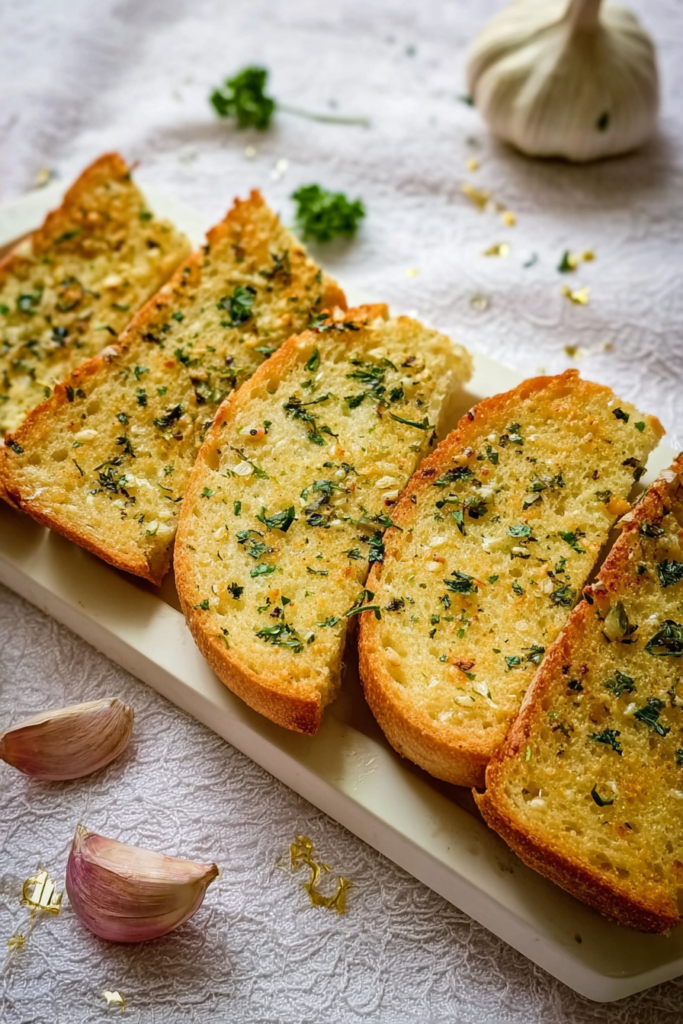
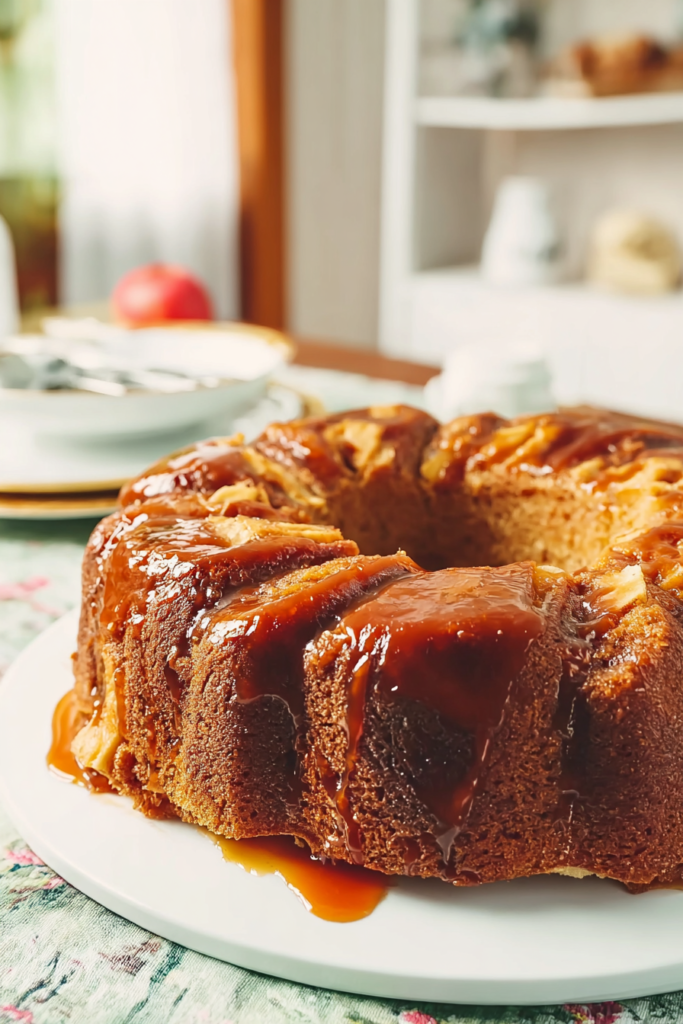
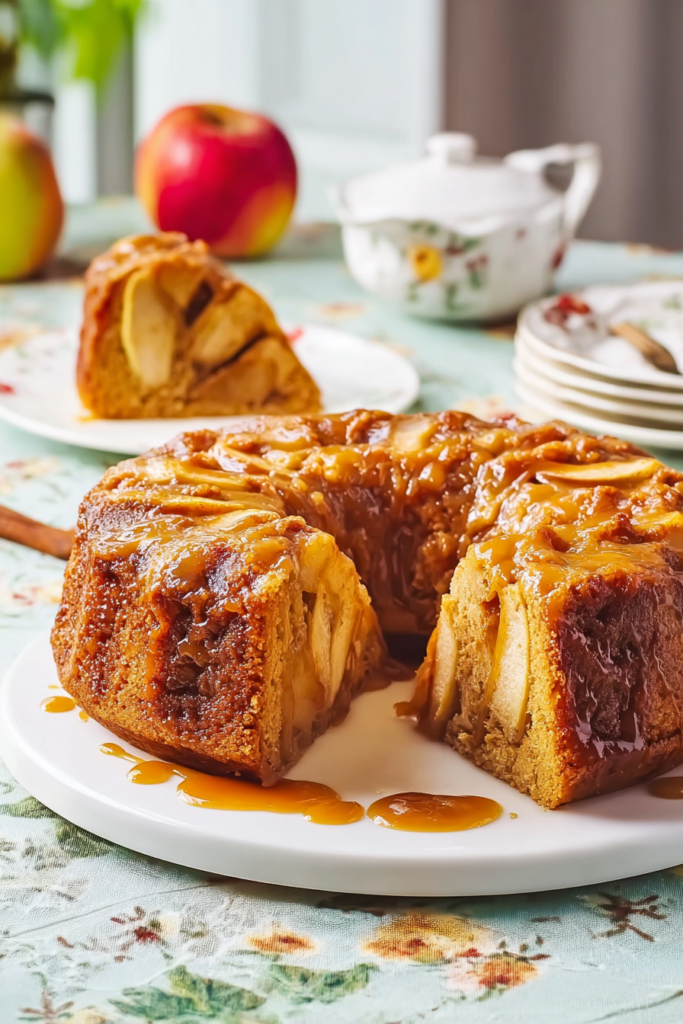
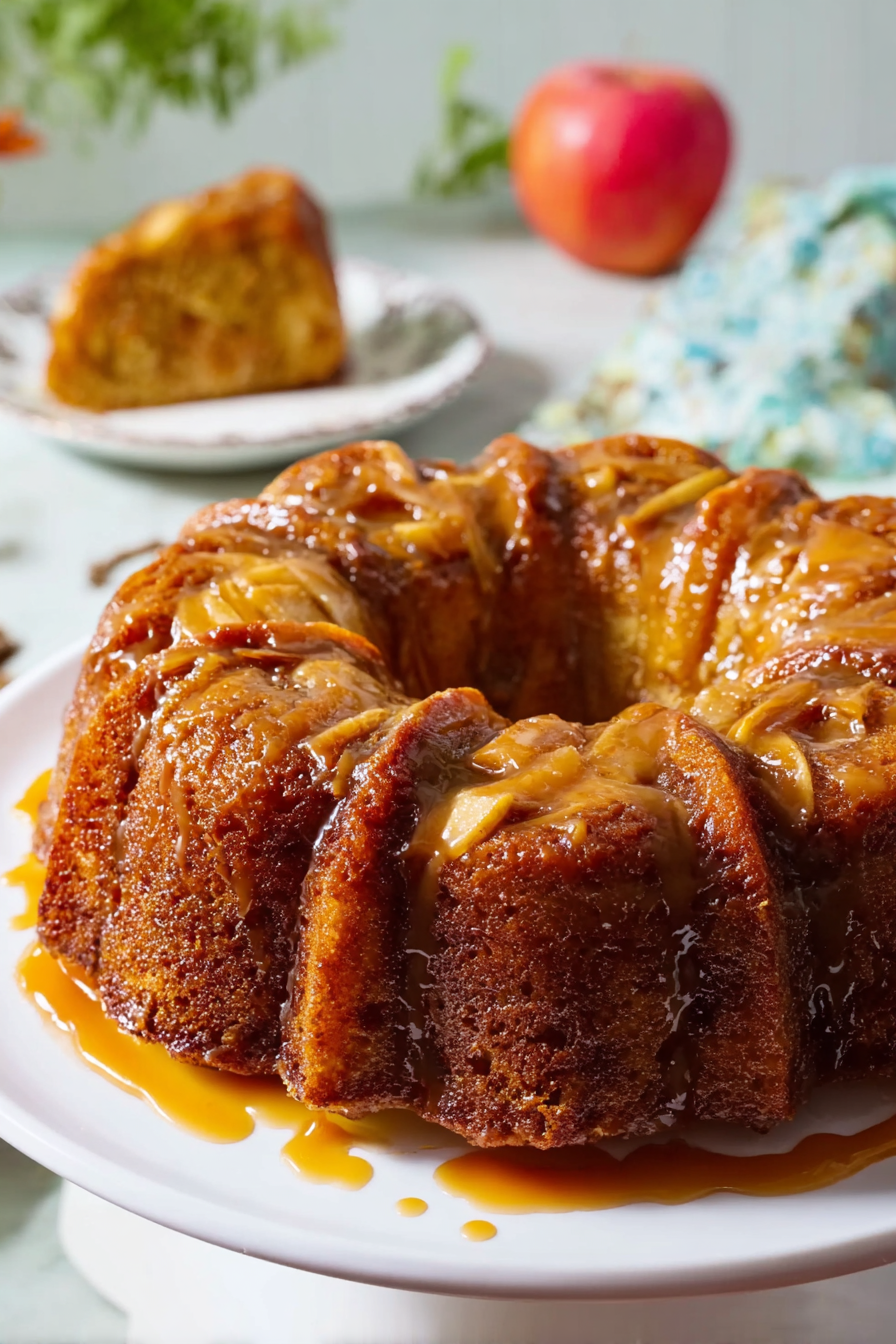
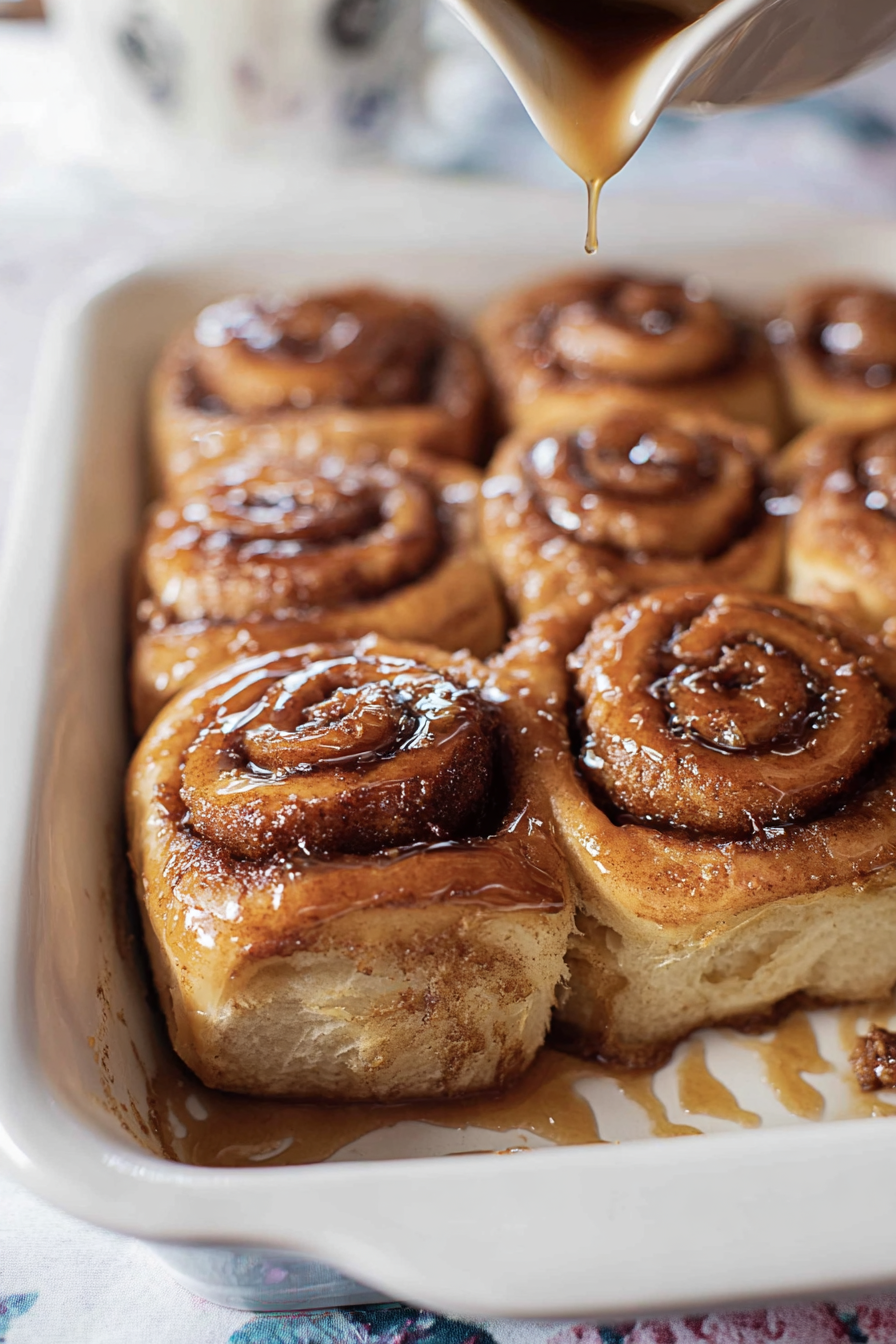
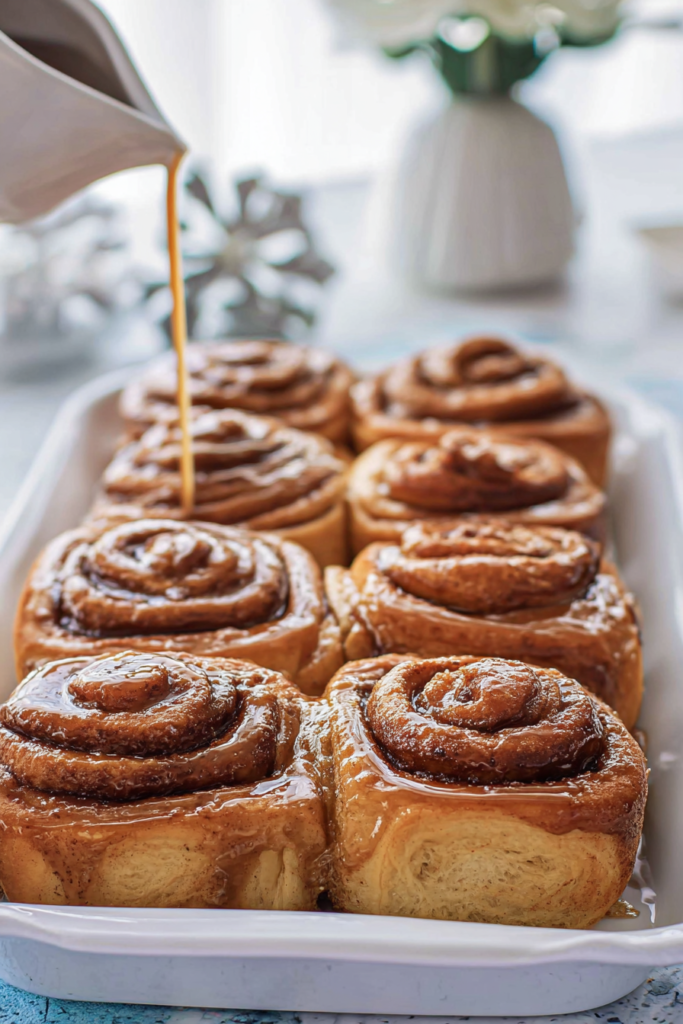
    The Final Touch

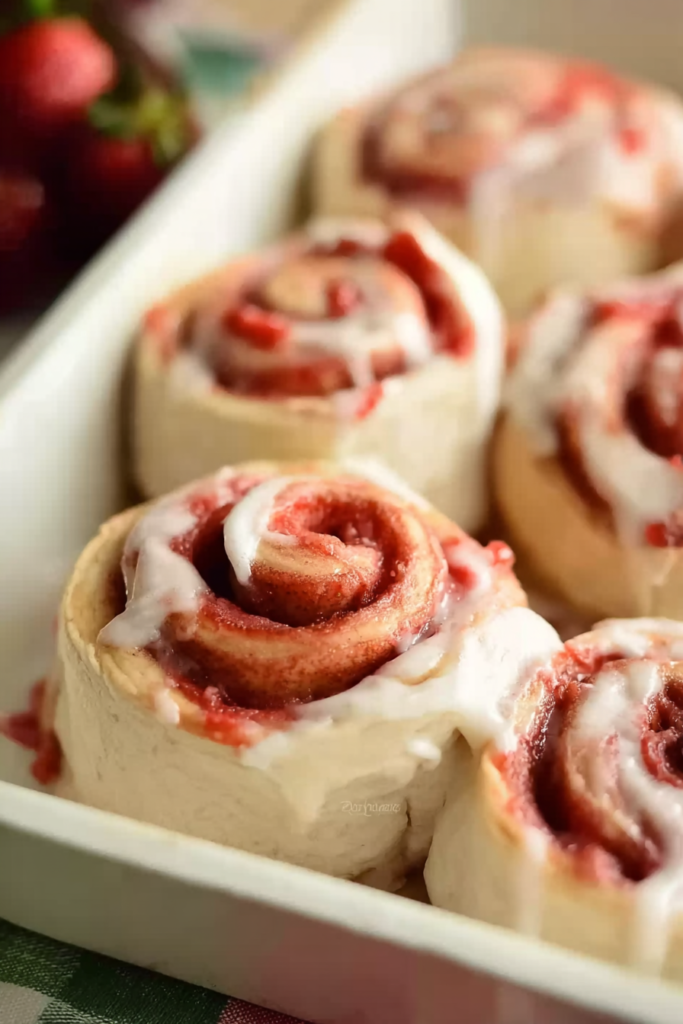
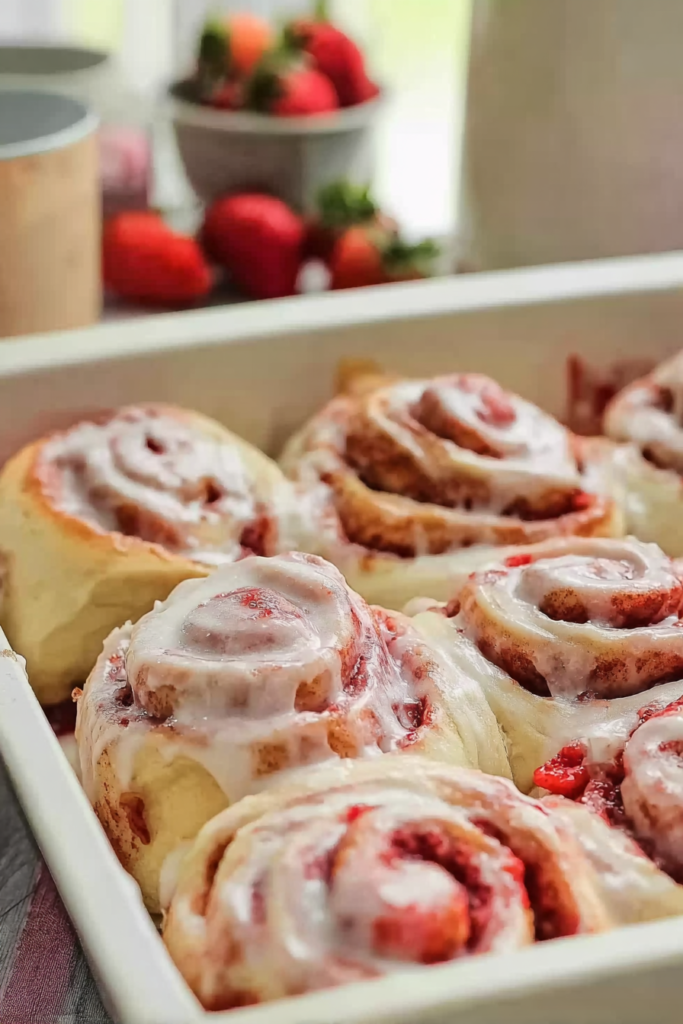
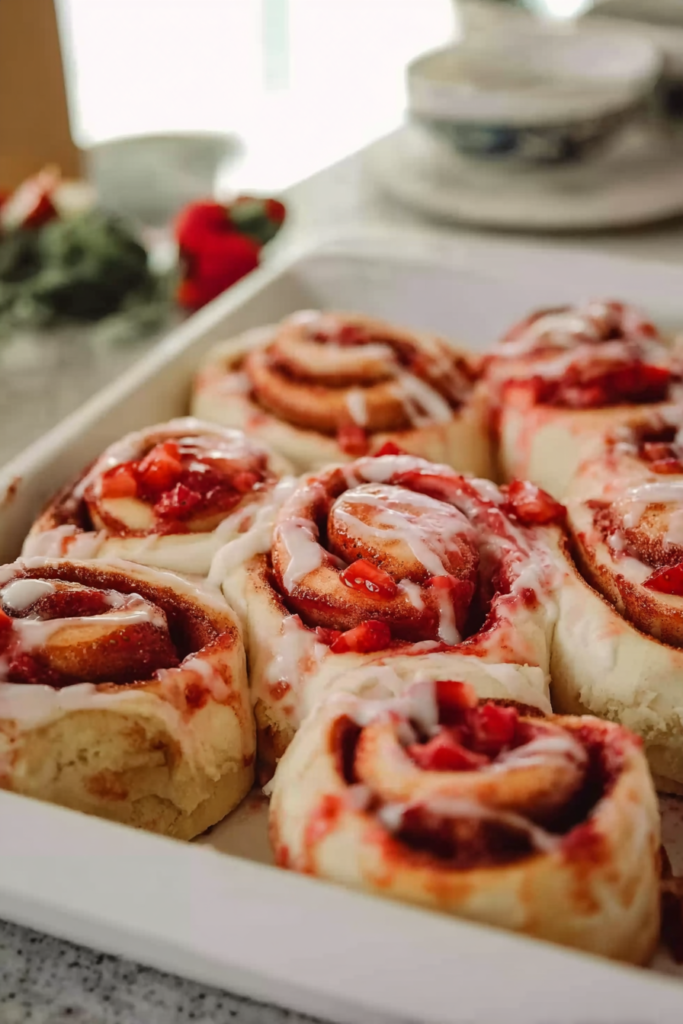
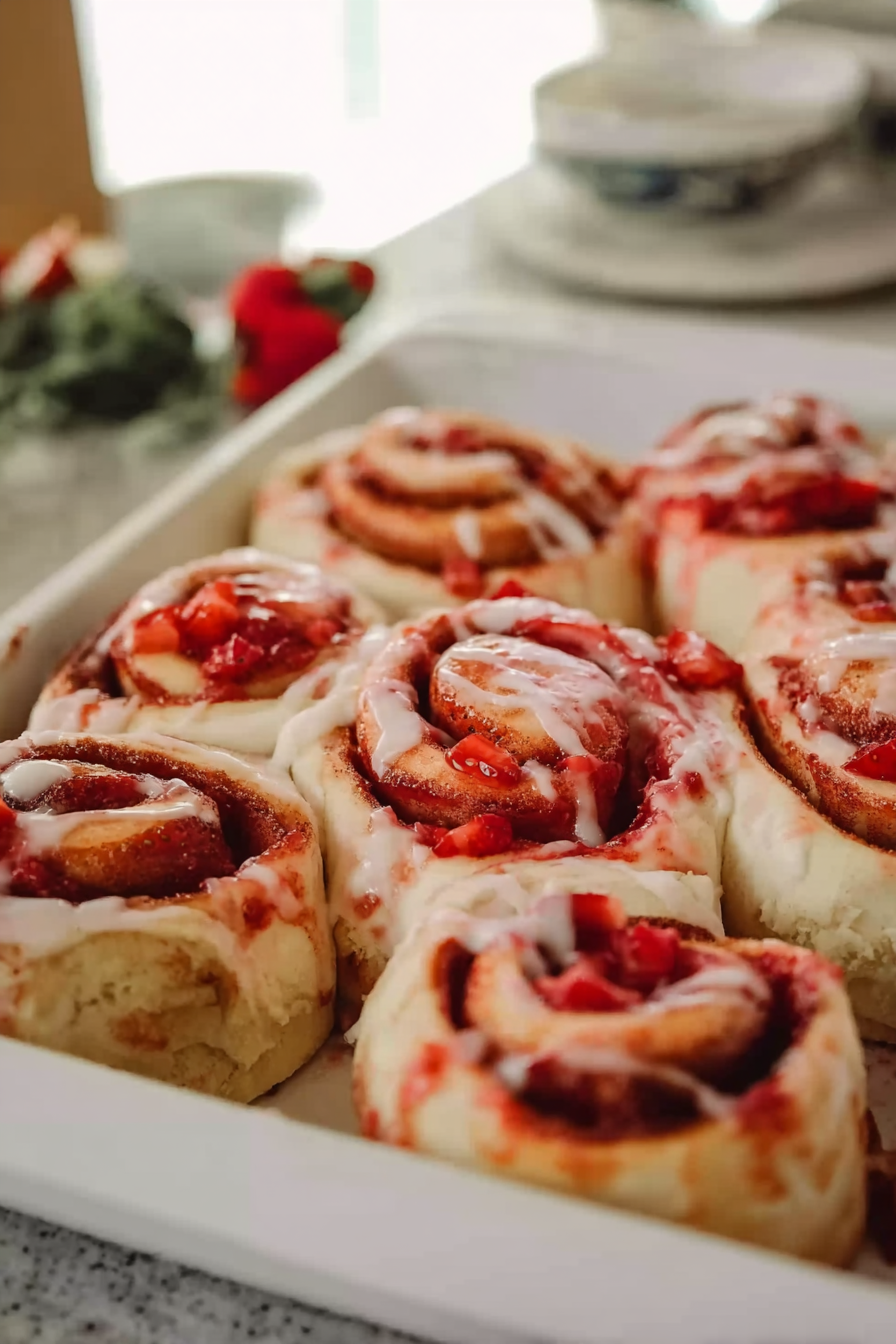
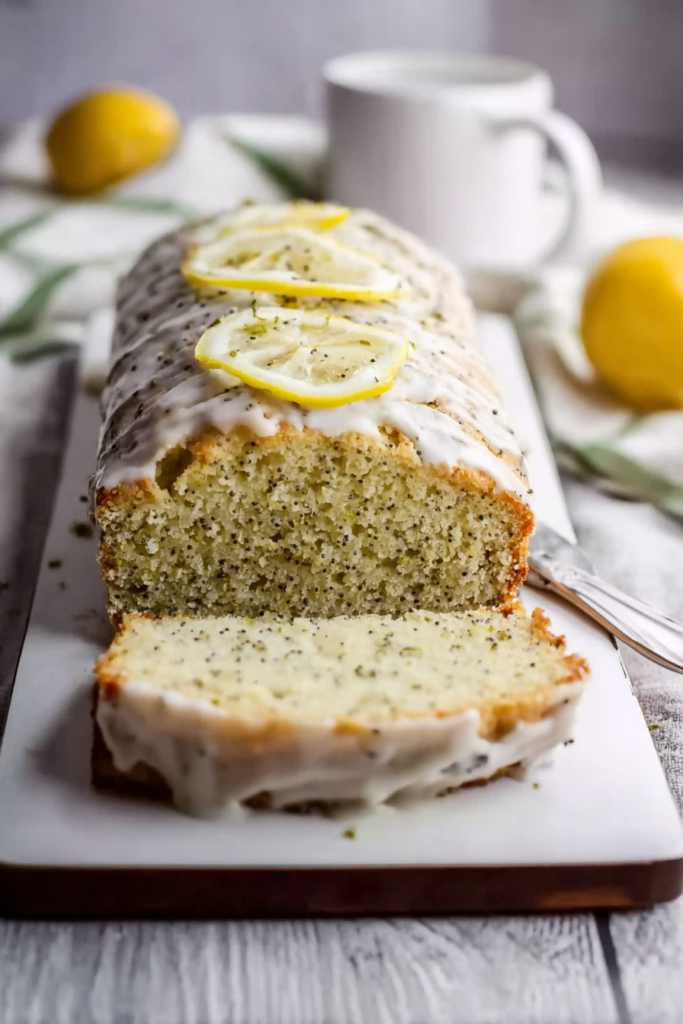
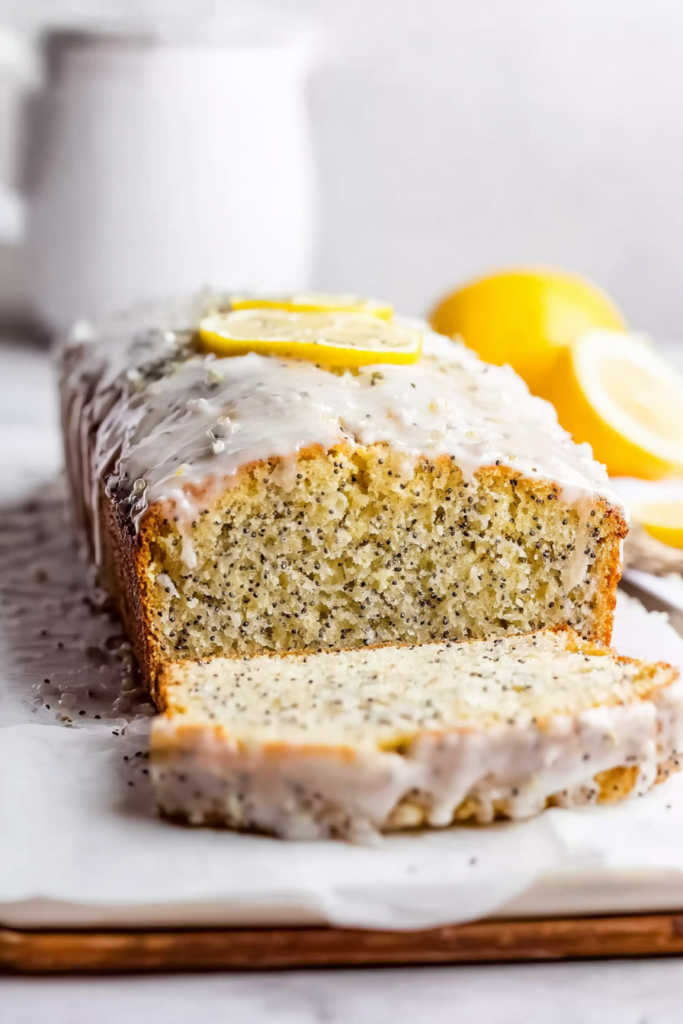
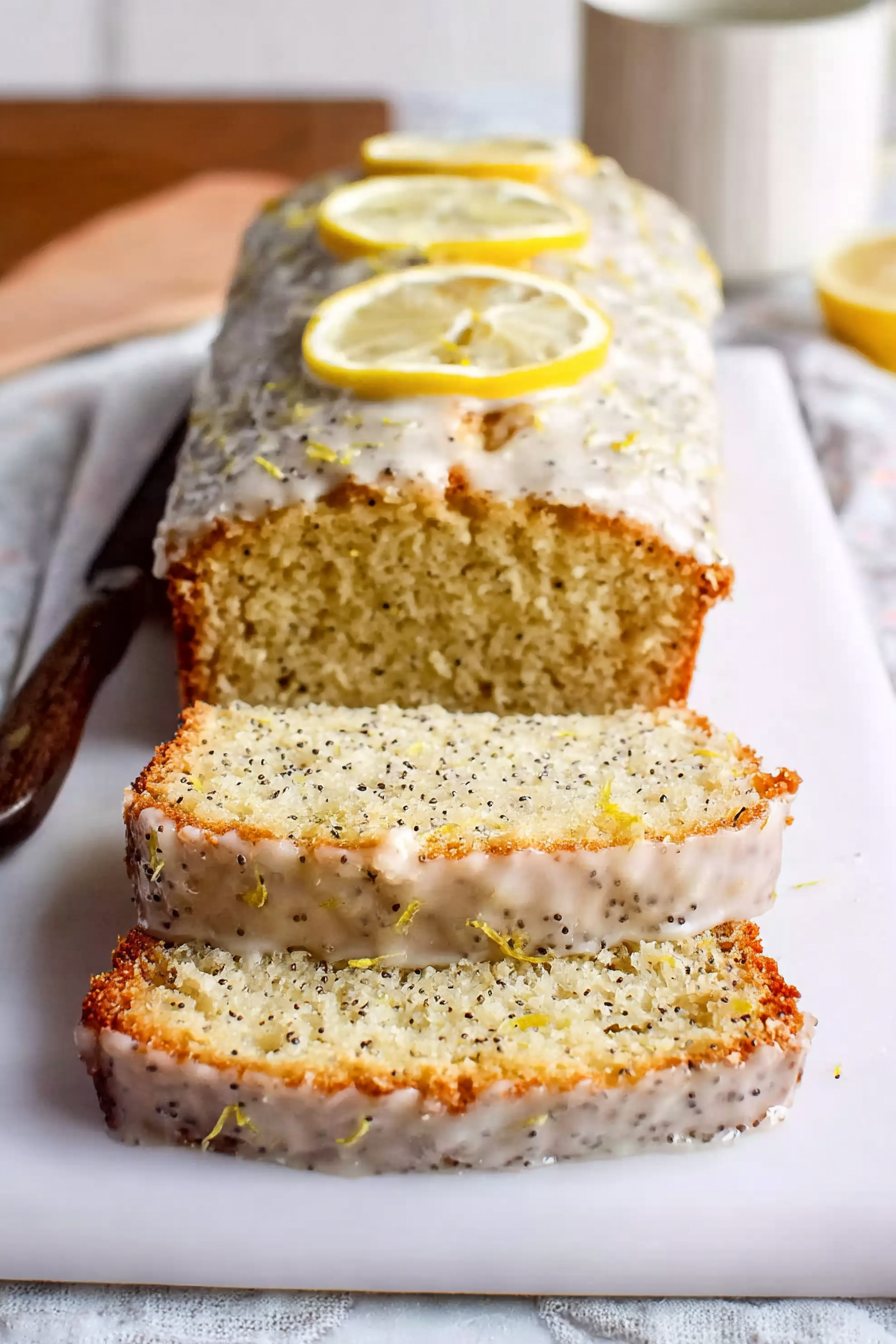
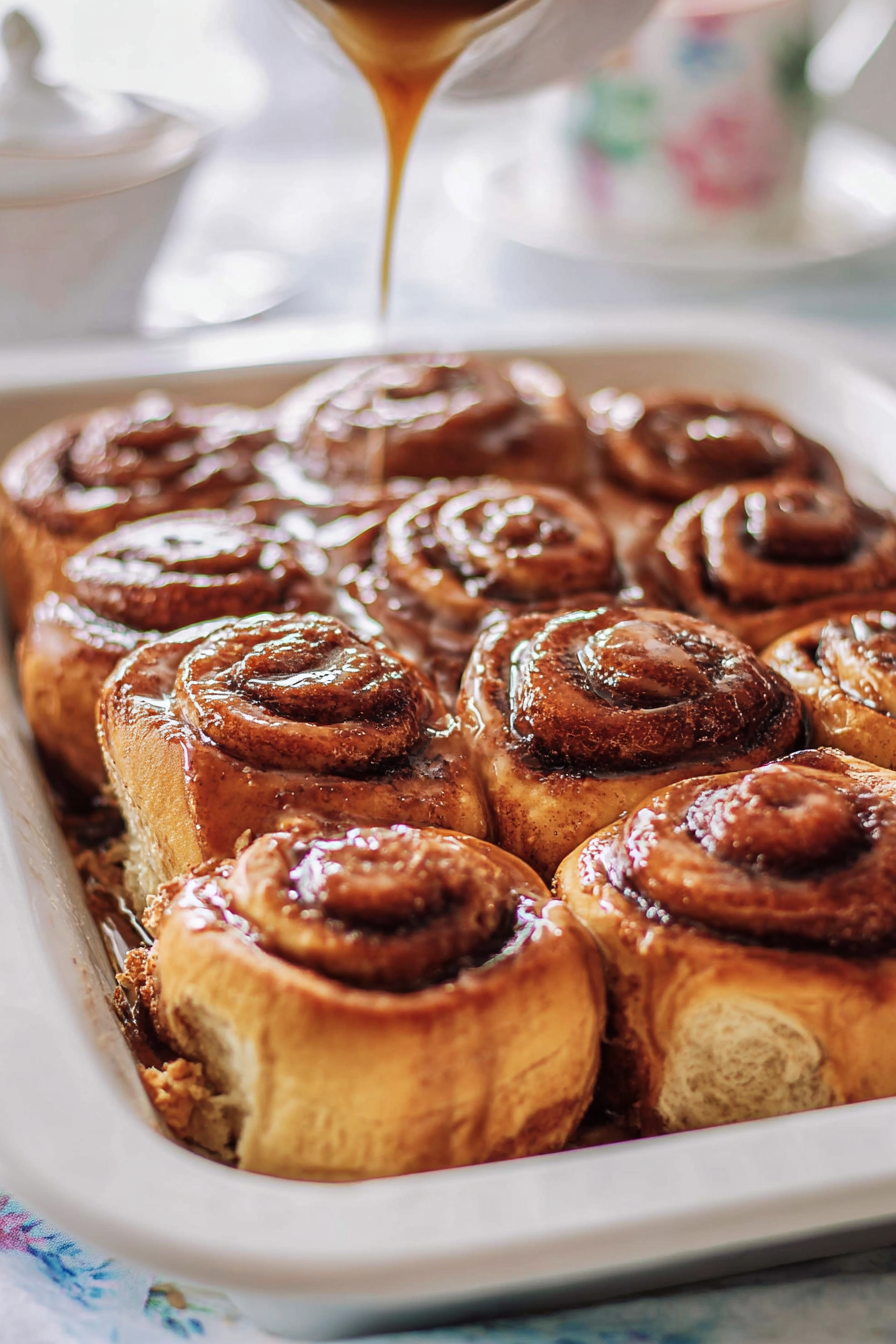
    The second that cake comes out of the oven, pour the glaze over it.

    Don’t wait. Don’t let it cool first. Do it immediately.

    The warmth helps the glaze seep into all those beautiful swirls and cracks. Watch it pool in the crevices and create this gorgeous glossy coating on top.

    I sometimes use the back of a spoon to spread it a bit. But mostly it finds its own way into every nook and cranny. This is what gives you that authentic cinnamon roll moistness everyone loves.
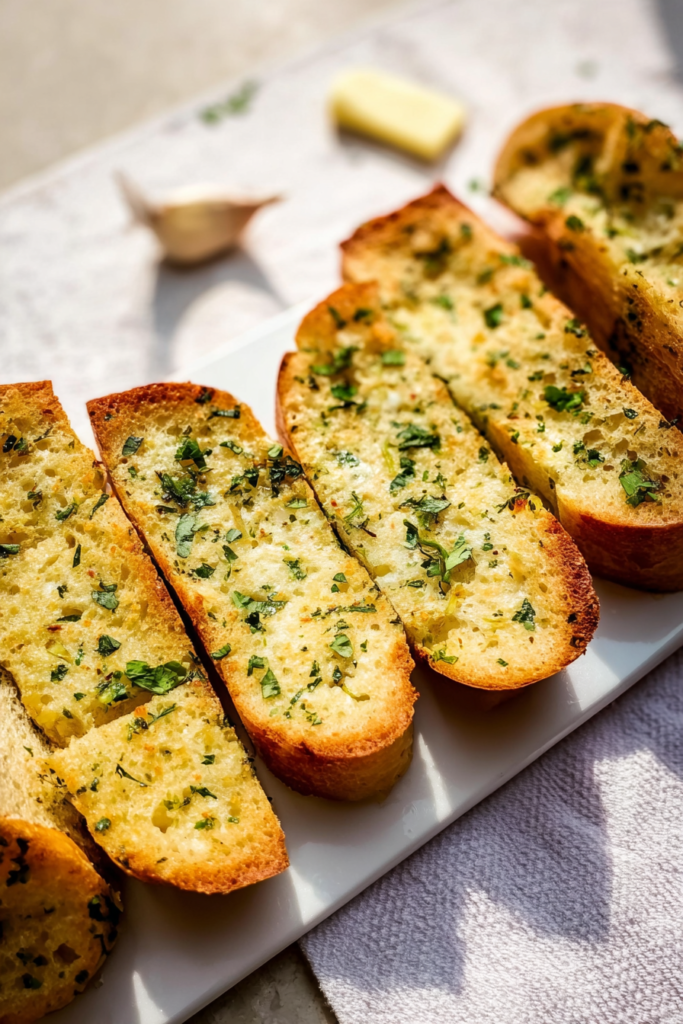
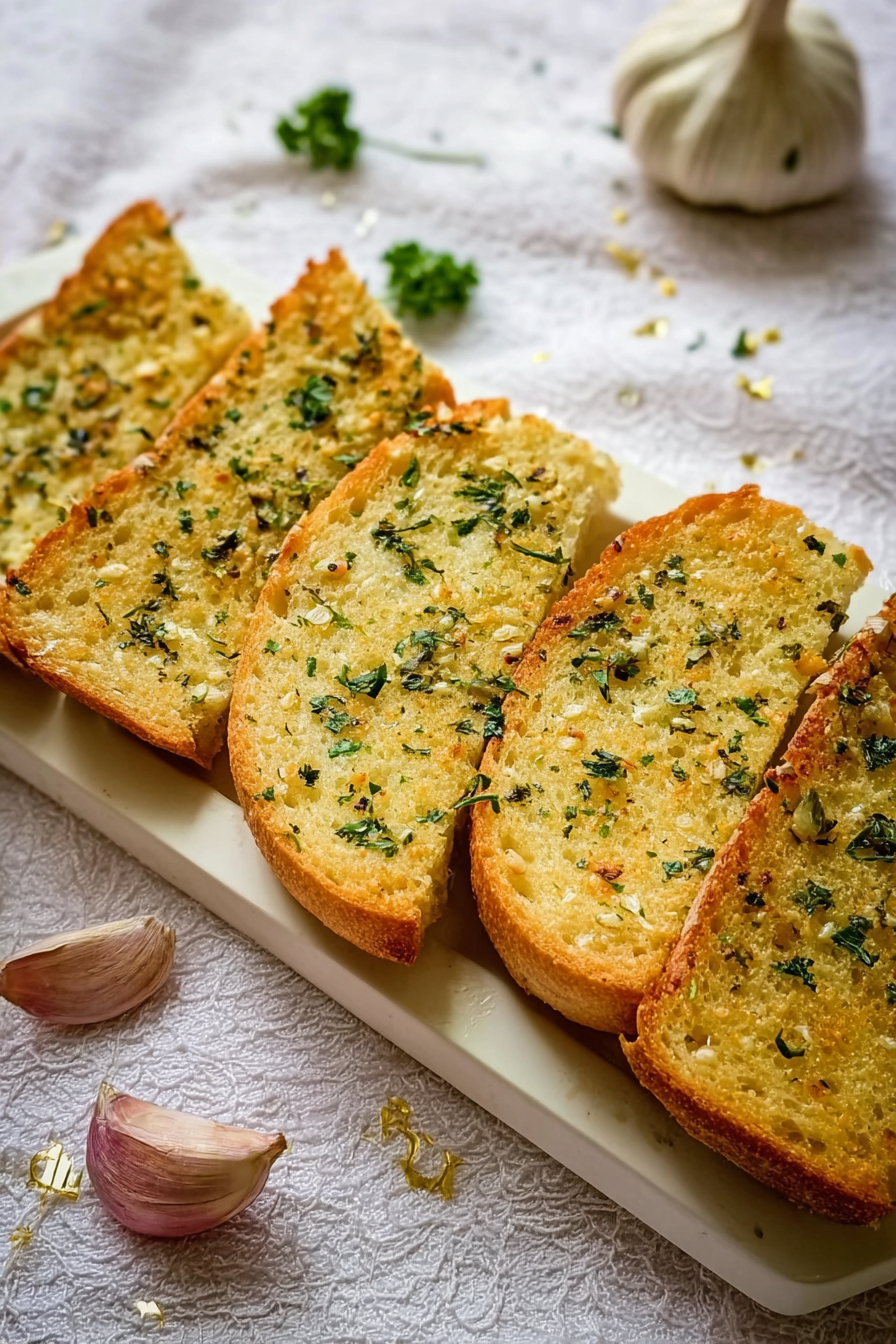
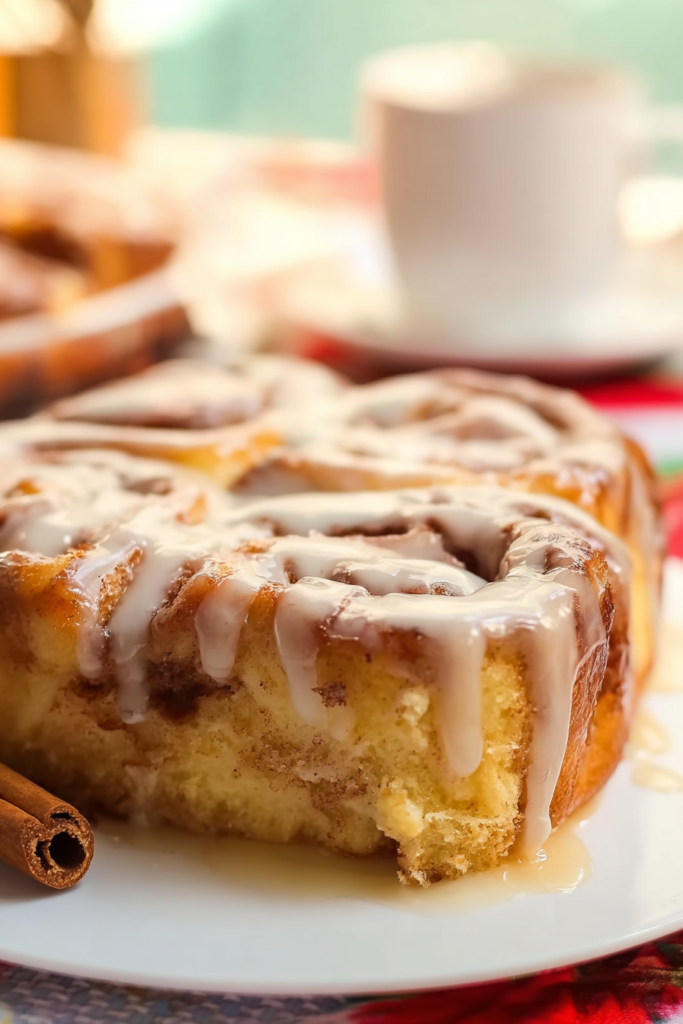
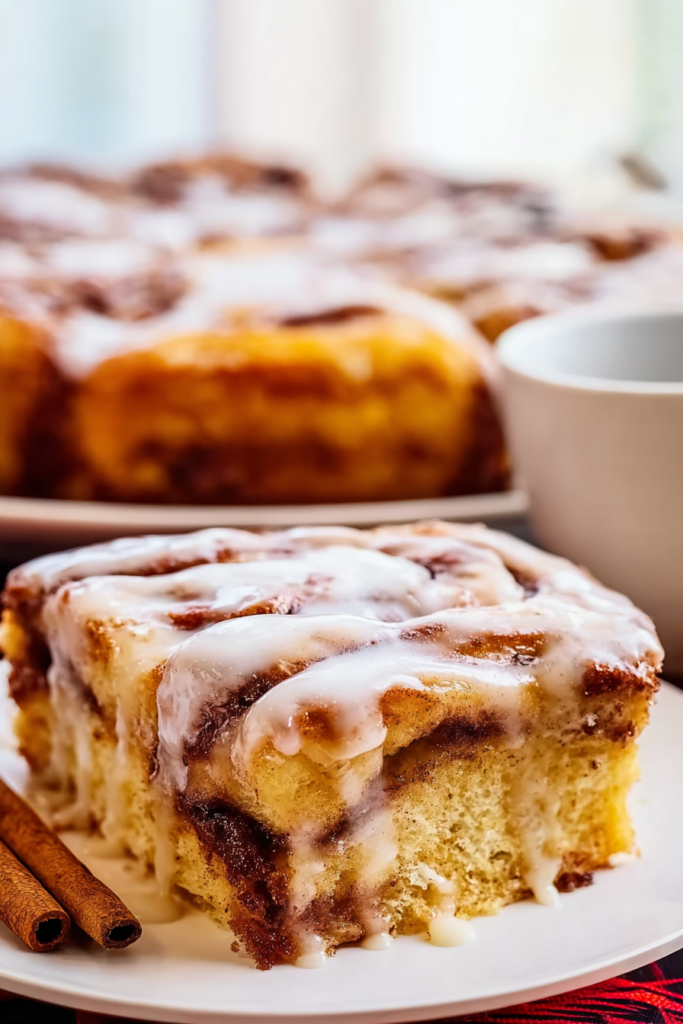
    Serving This Beauty

    You can serve this warm or at room temperature.

    Personally? I’m team warm all the way. When that glaze is still slightly melty and the cake is soft and fragrant? Chef’s kiss.

    But here’s the thing: it’s way easier to cut clean slices once it’s cooled for about 20 minutes.

    I usually cut mine into 12 big squares. But you could easily get 16 smaller portions if you’re serving a crowd.

    Serve it on its own for breakfast. Or go full indulgent and add a scoop of vanilla ice cream for dessert.

    Leftovers warm up beautifully in the microwave. Just 15-20 seconds and boom. Fresh-from-the-oven warmth again.

    My kids grab cold pieces straight from the counter too. Works either way.

    Pro Tips from My Kitchen

    After making this cake more times than I can count, here’s what actually matters:

    Temperature is non-negotiable. Room temperature eggs create more volume when you mix them. Cold milk causes butter lumps. I set everything out 30 minutes before I start baking. Every. Single. Time.

    Don’t skip the swirling. I got lazy once and just dolloped the filling on top without swirling it. The cake was… fine. Not spectacular. Just fine.

    Those swirls distribute the flavor and create that beautiful marbling everyone comments on. Take the extra two minutes. Worth it.

    Glaze while warm or regret it later. This isn’t a suggestion. If you want that authentic cinnamon roll texture, the cake needs to be warm when you pour the glaze.

    The warm cake absorbs the glaze, creating moisture throughout. Wait until it’s cool and the glaze just sits on top like a sad puddle.

    Check your baking powder. I cannot stress this enough. Fresh baking powder = fluffy, beautiful cake. Old baking powder = dense, flat disappointment.

    Test it first. Mix a teaspoon with hot water. Bubbles = good. No bubbles = throw it out and buy new.

    Adjust sweetness to your taste. My family has a serious sweet tooth, so this recipe works perfectly for us. But if you prefer less sugar, cut the glaze down to 1½ cups of powdered sugar. The cake itself will still be delicious.

    Storage and Freshness

    Want to keep this cake tasting amazing for days? Here’s what works:

    Room temperature storage: Cover the pan with aluminum foil. Or transfer slices to an airtight container. It stays fresh on your counter for 2-3 days.

    Don’t refrigerate it unless absolutely necessary. Cold air dries out homemade cakes something fierce.

    Freezing: This cake freezes like a dream for up to 3 months. I cut it into individual portions first. Then wrap each piece in plastic wrap followed by foil. Makes grabbing a single serving super easy.

    Thaw at room temperature for about an hour.

    Reheating: Microwave individual slices for 15-20 seconds. For the whole pan, cover with foil and warm in a 300°F oven for about 10 minutes. The glaze softens right up again, making it taste freshly baked.

    Variations I’ve Actually Tried

    Once I had the basic recipe down, I started playing around. Here are my favorite experiments:

    Cream Cheese Glaze: Replace the vanilla glaze with cream cheese frosting. Mix 4 ounces of softened cream cheese with 2 tablespoons of butter. Then gradually add powdered sugar and milk until spreadable.

    This creates a richer, tangier topping that tastes incredible.

    Nutty Addition: Fold ½ cup of chopped pecans or walnuts into the cinnamon filling. Adds a wonderful crunch and deeper flavor. Toast the nuts first for even better taste.

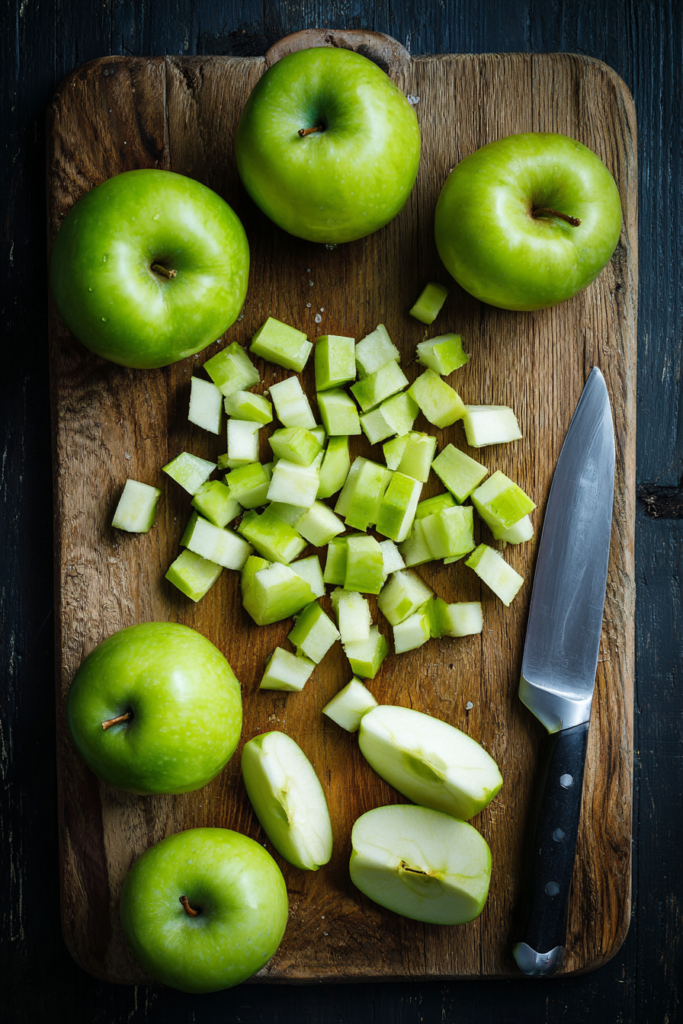
    Apple Cinnamon: Dice one small apple super finely and mix it into the cinnamon filling. The fruit adds moisture and this nice tartness that balances the sweetness perfectly.

    Extra Cinnamon for the Obsessed: If you’re like me and think everything needs more cinnamon, bump it up to 2 tablespoons in the filling. You could also sprinkle cinnamon sugar over the glaze for extra spice.

    Your Questions Answered

    Can I make this ahead of time?

    Absolutely. I bake this the night before all the time. Let it cool completely, then cover tightly with foil.

    Honestly? It tastes even better the next day. The flavors have time to meld together. Just add the glaze right before serving if you want it to look fresh.

    Why did my filling sink to the bottom?

    This usually happens when your batter is too thin or the filling is too heavy. Make sure you’re measuring flour correctly. Spoon it into your measuring cup rather than scooping.

    Also, that flour in the filling helps it stay suspended in the batter. Don’t skip it.

    Can I use a different pan size?

    You can adapt this with some timing adjustments. Two 8×8-inch pans work great but only need 25-30 minutes of baking time. A 9×9-inch pan holds half the recipe perfectly.

    Avoid bundt pans or muffin tins though. The filling tends to sink in those formats and makes a mess.

    Is there a dairy-free option?

    Yep. I’ve made this with substitutions and it works. Use your favorite non-dairy milk instead of regular milk. Replace butter with plant-based alternatives.

    The texture changes slightly but it’s still delicious.

    My cake turned out dense. What happened?

    Several things can cause this:

    • Overmixed batter (mix just until combined)
    • Too much flour (spoon it in, don’t scoop)
    • Old baking powder (test it first)

    Fix those three things and you’ll be golden.

    Can I reduce the sugar?

    The cake itself needs its sugar for structure. But you can definitely cut back on the glaze. Use just 1 cup of powdered sugar instead of 2.

    Or skip the glaze entirely and dust with powdered sugar instead.

    My Final Thoughts

    This Cinnamon Roll Cake has earned its spot as one of my most-requested recipes.

    It delivers everything wonderful about cinnamon rolls. The warm spice. The buttery sweetness. That incredible aroma. But without spending two hours waiting for dough to rise.

    The tender cake. Those gorgeous cinnamon swirls. The glossy glaze that makes everything better.

    Pure comfort food magic.

    I hope you love making this as much as I do. There’s something special about pulling a golden, fragrant cake from your oven. Watching it disappear within hours. Hearing everyone ask for the recipe.

    The compliments you’ll get make every minute worthwhile.

    Don’t let the ingredient list intimidate you. This recipe is genuinely easy once you get the hang of it. Trust the process. Follow the tips I shared. You’ll have bakery-quality results in your own kitchen.

    Now grab your ingredients and preheat that oven.

    Your kitchen is about to smell absolutely incredible.

    And you’re about to become everyone’s favorite baker.

    Happy baking!

    Recipe Card

    Cinnamon Roll Cake

    Prep Time: 10 minutes | Cook Time: 40 minutes | Total Time: 50 minutes
    Servings: 12 slices | Difficulty: Easy

    Ingredients

    For the Cake:

    • 3 cups all-purpose flour
    • 1 cup white granulated sugar
    • 4 teaspoons baking powder
    • 2 large eggs
    • 2 teaspoons vanilla extract
    • 1½ cups milk
    • ½ cup (1 stick) salted butter, melted and slightly cooled

    For the Cinnamon Filling:

    • ¾ cup (1½ sticks) salted butter, softened to room temperature
    • 1 cup packed light brown sugar
    • 2 tablespoons all-purpose flour
    • 1 tablespoon ground cinnamon

    For the Glaze:

    • 2 cups powdered sugar
    • 5 tablespoons milk
    • 1 teaspoon vanilla extract

    Instructions

    Preparing the Cake:

    1. Preheat your oven to 350°F. Spray a 9×13-inch baking dish with nonstick cooking spray.
    2. In a large bowl or stand mixer, combine flour, sugar, baking powder, eggs, vanilla extract, and milk.
    3. With the mixer running on medium-low speed, slowly pour in the melted butter. Mix until just combined (don’t overmix).
    4. Pour the batter into your prepared baking dish and spread evenly.

    Making the Filling:

    1. In a small bowl, combine softened butter, brown sugar, flour, and cinnamon. Mix until smooth and well combined.
    2. Drop spoonfuls of the cinnamon filling across the entire surface of the cake batter.
    3. Using a butter knife, create swirl patterns by dragging the knife through both the filling and batter. Make sure to reach the bottom of the pan.

    Baking:

    1. Bake for 35-40 minutes, until a knife inserted in the center comes out clean. The edges should be golden and pulling slightly from the pan sides.

    Finishing:

    1. While the cake bakes, whisk together powdered sugar, milk, and vanilla extract in a small bowl to make the glaze.
    2. Pour the glaze over the warm cake immediately after removing it from the oven.
    3. Let the cake cool for 15-20 minutes before slicing, or serve warm.

    Notes

    • Store covered at room temperature for up to 3 days
    • Freezes well for up to 3 months when wrapped properly
    • The filling can be made with 1 stick of butter instead of 1½ if you prefer less richness
    • Adjust glaze consistency by adding more milk (thinner) or powdered sugar (thicker)

    Nutrition (per slice)

    Approximate values: 538 calories | 82g carbohydrates | 5g protein | 21g fat

    Cinnamon Roll Cake

    Cinnamon Roll Cake

    This easy cinnamon roll cake delivers all the flavor of classic cinnamon rolls without the yeast and wait time. Ready in under an hour with a buttery cinnamon swirl and sweet vanilla glaze.
    Prep Time 10 minutes
    Cook Time 40 minutes
    Total Time 50 minutes
    Servings: 12 slices
    Course: Breakfast, Dessert
    Cuisine: American
    Calories: 538

    Ingredients
      

    For the Cake
    • 3 cups all-purpose flour
    • 1 cup white granulated sugar
    • 4 teaspoons baking powder
    • 2 large eggs
    • 2 teaspoons vanilla extract
    • cups milk
    • ½ cup salted butter melted and slightly cooled (1 stick)
    For the Cinnamon Filling
    • ¾ cup salted butter softened to room temperature (1½ sticks)
    • 1 cup light brown sugar packed
    • 2 tablespoons all-purpose flour
    • 1 tablespoon ground cinnamon
    For the Glaze
    • 2 cups powdered sugar
    • 5 tablespoons milk
    • 1 teaspoon vanilla extract

    Method
     

    1. Preheat your oven to 350°F. Spray a 9×13-inch baking dish with nonstick cooking spray.
    2. In a large bowl or stand mixer, combine flour, sugar, baking powder, eggs, vanilla extract, and milk.
    3. With the mixer running on medium-low speed, slowly pour in the melted butter. Mix until just combined (don’t overmix).
    4. Pour the batter into your prepared baking dish and spread evenly.
    5. In a small bowl, combine softened butter, brown sugar, flour, and cinnamon. Mix until smooth and well combined.
    6. Drop spoonfuls of the cinnamon filling across the entire surface of the cake batter.
    7. Using a butter knife, create swirl patterns by dragging the knife through both the filling and batter. Make sure to reach the bottom of the pan.
    8. Bake for 35-40 minutes, until a knife inserted in the center comes out clean. The edges should be golden and pulling slightly from the pan sides.
    9. While the cake bakes, whisk together powdered sugar, milk, and vanilla extract in a small bowl to make the glaze.
    10. Pour the glaze over the warm cake immediately after removing it from the oven.
    11. Let the cake cool for 15-20 minutes before slicing, or serve warm.

    Notes

    Store covered at room temperature for up to 3 days. Freezes well for up to 3 months when wrapped properly. The filling can be made with 1 stick of butter instead of 1½ if you prefer less richness. Adjust glaze consistency by adding more milk (thinner) or powdered sugar (thicker).
  • Strawberry Cinnamon Rolls Recipe | Easy Homemade Guide

    Strawberry Cinnamon Rolls Recipe | Easy Homemade Guide

    You know that feeling when you wake up to cinnamon rolls baking?

    That smell.

    It’s pure magic. The warm, sweet scent wrapping around you like a cozy blanket. Making you want to jump out of bed instead of hitting snooze.

    Today I’m showing you my absolute favorite twist on this breakfast classic. Strawberry Cinnamon Rolls.

    And no, we’re not talking about those ones from a can that you whack on the counter. These are the real deal. Homemade. Loaded with fresh strawberries. Worth every single minute of effort.

    The combo of warm cinnamon and sweet strawberry jam? It creates this flavor explosion that’ll have everyone circling back for seconds. And thirds.

    I won’t lie to you. My kitchen looked like a flour bomb went off the first time I made these. But honestly? That’s how you know you’re making something good. The mess is totally worth it when you bite into these soft, gooey rolls with strawberries bursting everywhere.

    What Makes These Rolls So Special

    Look, traditional cinnamon rolls are great.

    But adding strawberries? Game changer.

    The fresh fruit does something magical. It adds moisture. It brings this bright, fruity flavor that cuts through the richness of the dough. Plus they look stunning with those pink swirls peeking through.

    I make these for special weekend breakfasts. When guests are staying over. When I want to feel fancy on a random Sunday morning.

    Here’s the thing though.

    They look way more complicated than they actually are. Even if you’ve never touched yeast dough before, you can totally do this. I promise I’ll walk you through every single step.

    strawberry cinnamon rolls

    Why You’re Going to Love This Recipe

    First off, these are made from scratch. Which means you control every ingredient. No weird preservatives. No artificial anything.

    Second? The fresh strawberries add this incredible texture and natural sweetness that jam alone just can’t match.

    Third? They work for literally any occasion:

    • Mother’s Day brunch
    • Birthday breakfast in bed
    • Random Tuesday when you need something special
    • Holiday mornings

    The dough comes together super easily. And while it’s rising, you can clean up your kitchen. Or make coffee. Or just sit there scrolling your phone.

    From start to finish? About 90 minutes.

    That includes everything. Prep. Rising. Baking. Not bad for homemade cinnamon rolls that’ll make you look like a professional baker.

    Recipe Timing & Yield

    TimingDuration
    Prep Time20 minutes
    Rise Time40 minutes
    Cook Time30 minutes
    Total Time1 hour 30 minutes
    Servings12 rolls
    DifficultyMedium

    Ingredients You’ll Need

    IngredientQuantityNotes
    Milk3/4 cupWarmed to lukewarm
    Margarine or butter1/3 cupSoftened
    All-purpose flour3 1/4 cupsPlus extra for kneading
    Instant yeast2 tsps (1 packet)Active dry works too
    Sugar1/4 cupFor dough sweetness
    Salt1/2 tspEnhances flavor
    Egg1 largeRoom temperature preferred
    Water1/4 cupRoom temperature
    For the Filling
    Strawberry jam1 cupAdjust to preference
    Cinnamon1/2 tspFor sprinkling
    Fresh strawberries2 cupsSliced thin
    For the Icing
    Powdered sugar1 cupSifted for smoothness
    Cinnamon1/4 tspOptional for icing
    Milk1-2 tbspAdjust for consistency
    strawberry cinnamon rolls

    Let’s Make Some Magic (Step-by-Step)

    Getting Started with the Dough

    Okay, first things first.

    Pour 3/4 cup milk into a small saucepan. Heat it on medium until it’s warm to the touch. Lukewarm, not hot. This is important. Hot milk will kill your yeast, and then you’re just making expensive doorstops instead of cinnamon rolls.

    Once the milk is warm, add your softened margarine or butter. Stir until it melts completely. Remove from heat and let it cool a bit while you grab your dry ingredients.

    Now grab a large mixing bowl.

    Add 2 1/4 cups of flour, the yeast, sugar, and salt. Give it a good whisk. You want everything distributed evenly so the yeast spreads throughout the flour.

    strawberry cinnamon rolls

    Crack in your egg. Add the 1/4 cup of water. Pour in your warm milk mixture.

    Stir everything with a wooden spoon until you get this shaggy, messy-looking dough. Don’t panic. It’s supposed to look like that.

    Time to add the last cup of flour.

    Mix it in gradually. The dough should start pulling away from the bowl sides. You want it soft and slightly sticky.

    The Kneading Part (It’s Actually Fun)

    Turn your dough onto a lightly floured surface.

    Now comes the therapeutic part. Kneading.

    Push the dough away with the heel of your hand. Fold it back. Rotate. Repeat.

    Do this for about 5 minutes. Your dough should transform from sticky and rough to smooth and elastic. It’s honestly pretty satisfying to watch.

    Pop the dough back in the bowl. Cover it with a damp kitchen towel. Let it rest for 10 minutes.

    Why?

    This short rest relaxes the gluten. Makes the dough way easier to roll out. Trust the process.

    Rolling and Filling Time

    After your 10-minute break, turn the dough back onto your floured surface.

    Grab your rolling pin. Roll it into a large rectangle.

    Mine never looks like a perfect rectangle. More like an oval with ambitions. And you know what? The rolls still turn out amazing. Don’t stress about perfection here.

    Now for the fun part.

    Spread that strawberry jam all over the dough. Edge to edge. Don’t be stingy.

    Sprinkle the cinnamon over the jam.

    Then arrange your sliced strawberries evenly across everything. Use all of them. More strawberries = more deliciousness.

    strawberry cinnamon rolls

    Starting from the longest side, carefully roll the dough into a log.

    Keep it tight. But not too tight. You don’t want filling squishing out everywhere.

    When you reach the end, pinch the seam to seal it shut.

    Here’s a pro tip I learned the hard way:

    Use unflavored dental floss to cut the rolls. Seriously. A sharp knife works too, but dental floss cuts clean without squashing everything.

    Slice your log into 12 equal pieces. Each should be about 1 to 1.5 inches thick.

    The Second Rise and Baking

    Arrange your rolls cut-side up in a greased 11×13 inch baking dish.

    They should be close but not touching. Think of them as introverts at a party. They need personal space.

    Cover the pan with a damp cloth. Let them rise for 30 minutes. They’ll puff up and get all pretty.

    While they’re rising, preheat your oven to 375°F.

    Once the 30 minutes are up, slide that pan into the oven.

    Bake for 25-30 minutes. You’re looking for golden brown tops. When you tap them, they should sound hollow.

    Making That Perfect Icing

    While your rolls are baking, whisk together the powdered sugar, cinnamon, and milk in a small bowl.

    Start with 1 tablespoon of milk. Add more if you need it.

    You want a drizzle consistency. Not too thick. Not too runny. Like… pancake syrup thickness.

    When the rolls come out, let them cool for 5 minutes.

    Then drizzle that icing generously over the warm rolls. The heat helps it seep into all the nooks and crannies. It’s beautiful.

    Tips That’ll Save Your Rolls (And Your Sanity)

    Check Your Yeast First

    Before you start anything, check your yeast expiration date.

    Old yeast = dense, sad rolls.

    Not sure if yours is good? Proof it first. Mix it with warm water and a pinch of sugar. Wait 5-10 minutes. If it gets foamy, you’re golden.

    Temperature Really Does Matter

    Your egg and water should be room temperature.

    Cold ingredients shock the yeast. Slows everything down. Nobody has time for that.

    Don’t Skip That 10-Minute Rest

    I know you’re excited. I get it.

    But that rest after kneading? Crucial.

    It relaxes the gluten. Makes rolling out the dough so much easier. Skip it, and you’ll be fighting with stubborn dough that keeps shrinking back.

    The Dental Floss Trick

    Use a very sharp knife or unflavored dental floss to cut your rolls.

    A dull knife just squishes them. Pushes out all that beautiful filling. We worked too hard for that.

    strawberry cinnamon rolls

    Ways to Mix It Up

    Going Dairy-Free?

    No problem.

    Swap the milk for:

    • Almond milk
    • Oat milk
    • Coconut milk

    Use dairy-free margarine instead of butter. The texture stays pretty much the same. I’ve tested it. You’re good.

    Try Different Berries

    Strawberries are amazing. But so are:

    • Raspberry jam with fresh raspberries
    • Blueberry jam (seriously underrated)
    • Mixed berry jam with whatever berries you have

    Get creative. Experiment. Report back.

    Want Cream Cheese Frosting Instead?

    Beat together:

    • 4 oz softened cream cheese
    • 2 tbsp butter
    • 1 cup powdered sugar
    • A splash of vanilla

    Spread it on warm rolls. Prepare to pass out from happiness.

    The Make-Ahead Option

    Life hack incoming.

    Assemble the rolls the night before. Cover them tight with plastic wrap. Stick them in the fridge.

    In the morning, let them sit at room temperature for 30 minutes. Then bake as usual.

    Fresh cinnamon rolls without the morning chaos? Yes please.

    Freezing for Later

    You can freeze these before or after baking.

    For unbaked rolls:

    • Freeze them in the pan wrapped tightly
    • Thaw overnight in the fridge
    • Let rise, then bake

    For baked rolls:

    • Freeze individually wrapped
    • Reheat in the microwave for 30 seconds
    • Boom, instant breakfast

    Storage Tips

    Keep leftover rolls in an airtight container in the fridge.

    They’ll stay good for up to 3 days. The strawberries stay fresh. The rolls stay soft.

    Want to heat one up? Microwave for 15-20 seconds.

    You get that fresh-baked taste without turning on the oven.

    Your Questions Answered

    Can I use active dry yeast instead of instant yeast?

    Yep, absolutely.

    Dissolve it in the warm milk with a pinch of sugar. Wait 5-10 minutes until it gets foamy. Then keep going with the recipe as written.

    My dough isn’t rising. What did I do wrong?

    Usually it’s one of these:

    • Dead yeast (check that expiration date)
    • Liquid was too hot or too cold (aim for 105-115°F)
    • Your kitchen is too cold (find a warmer spot)

    Yeast is picky. But once you get the hang of it, you’ll be fine.

    Can I make these without fresh strawberries?

    Sure can.

    Just use the jam. It’s a simpler version. The fresh strawberries add amazing texture and flavor, but all-jam rolls are still delicious.

    How do I know when they’re done baking?

    Look for:

    • Golden brown tops
    • Firm when you press them lightly
    • Internal temp of 190°F if you have a thermometer

    Can I double this recipe?

    Definitely.

    Double everything. Use two 11×13 baking dishes. The rising and baking times stay the same.

    Final Thoughts

    These Strawberry Cinnamon Rolls prove something important.

    Homemade really is better.

    The soft, fluffy dough. The sweet strawberries. That perfect touch of cinnamon. It all comes together into a breakfast worth waking up for.

    Yeah, they take longer than store-bought. But every single minute is worth it.

    The beautiful thing? This recipe is super flexible.

    Make them for a special occasion. Or just because it’s Saturday. Prep them the night before for easy weekend breakfast. Freeze extras for unexpected guests.

    So grab your apron. Dust that counter with flour. Give these rolls a try.

    Your kitchen is about to smell incredible.

    Your family is going to think you’re some kind of baking genius.

    And honestly? These Strawberry Cinnamon Rolls are about to become your new favorite weekend tradition.

    Trust me on this one.

    Strawberry Cinnamon Rolls

    Strawberry Cinnamon Rolls

    Homemade cinnamon rolls loaded with fresh strawberries and sweet jam. These soft, fluffy rolls combine warm cinnamon with bright strawberry flavor for the perfect breakfast treat.
    Prep Time 20 minutes
    Cook Time 30 minutes
    Rise Time 40 minutes
    Total Time 1 hour 30 minutes
    Servings: 12 rolls
    Course: Breakfast, Brunch
    Cuisine: American

    Ingredients
      

    For the Dough
    • 3/4 cup milk warmed to lukewarm
    • 1/3 cup margarine or butter softened
    • 3 1/4 cups all-purpose flour plus extra for kneading
    • 2 tsps instant yeast 1 packet, active dry works too
    • 1/4 cup sugar
    • 1/2 tsp salt
    • 1 egg large, room temperature preferred
    • 1/4 cup water room temperature
    For the Filling
    • 1 cup strawberry jam
    • 1/2 tsp cinnamon
    • 2 cups fresh strawberries sliced thin
    For the Icing
    • 1 cup powdered sugar sifted
    • 1/4 tsp cinnamon optional
    • 1-2 tbsp milk adjust for consistency

    Method
     

    Prepare the Dough
    1. Heat milk in a small saucepan over medium heat until lukewarm (not hot). Add softened margarine or butter and stir until melted. Remove from heat and let cool slightly.
    2. In a large mixing bowl, combine 2 1/4 cups flour, yeast, sugar, and salt. Whisk to distribute evenly.
    3. Add the egg, water, and warm milk mixture to the flour mixture. Stir with a wooden spoon until a shaggy dough forms.
    4. Gradually mix in the remaining 1 cup of flour until the dough pulls away from the bowl sides and is soft and slightly sticky.
    Knead and Rest
    1. Turn dough onto a lightly floured surface and knead for 5 minutes, pushing away with the heel of your hand, folding back, and rotating until smooth and elastic.
    2. Place dough back in the bowl, cover with a damp kitchen towel, and let rest for 10 minutes.
    Roll and Fill
    1. Turn the rested dough onto a floured surface and roll into a large rectangle.
    2. Spread strawberry jam evenly over the dough, edge to edge. Sprinkle cinnamon over the jam, then arrange sliced strawberries evenly across the surface.
    3. Starting from the longest side, carefully roll the dough into a tight log. Pinch the seam to seal.
    4. Using unflavored dental floss or a sharp knife, slice the log into 12 equal pieces (1 to 1.5 inches thick each).
    Second Rise and Bake
    1. Arrange rolls cut-side up in a greased 11×13 inch baking dish, leaving space between them. Cover with a damp cloth and let rise for 30 minutes.
    2. Preheat oven to 375°F (190°C).
    3. Bake for 25-30 minutes until golden brown and rolls sound hollow when tapped.
    Make Icing and Serve
    1. While rolls bake, whisk together powdered sugar, cinnamon, and 1 tablespoon milk in a small bowl. Add more milk if needed to reach drizzle consistency.
    2. Let rolls cool for 5 minutes, then drizzle icing generously over warm rolls. Serve immediately.

    Notes

    Make-Ahead: Assemble rolls the night before, cover tightly with plastic wrap, and refrigerate. In the morning, let sit at room temperature for 30 minutes before baking.
    Storage: Store leftover rolls in an airtight container in the refrigerator for up to 3 days. Reheat in microwave for 15-20 seconds.
    Freezing: Freeze unbaked rolls in the pan wrapped tightly, or freeze baked rolls individually wrapped. Reheat frozen baked rolls in microwave for 30 seconds.
    Dairy-Free: Substitute almond milk, oat milk, or coconut milk for regular milk and use dairy-free margarine.
    Yeast Check: Always check yeast expiration date. If unsure, proof it first by mixing with warm water and a pinch of sugar for 5-10 minutes until foamy.
  • Lemon Blueberry Dutch Baby Recipe (Easy & Impressive)

    Lemon Blueberry Dutch Baby Recipe (Easy & Impressive)

    You know that feeling when you open the oven and see something magical happening?

    That’s exactly what happens every time I make a Dutch baby.

    The edges puff up like crazy. They tower over the skillet, golden and crispy. Meanwhile, the center stays soft and custardy. Add bright lemon zest and juicy blueberries? You’ve got yourself a breakfast that looks fancy but honestly takes less work than regular pancakes.

    Here’s why I’m obsessed with Dutch babies.

    No griddle. No flipping. No temperature babysitting.

    You blend a batter, pour it into a hot skillet with butter and berries, then walk away. Your oven does everything else.

    lemon blueberry dutch baby

    The lemon-blueberry combo? Perfect.

    The citrus adds brightness without taking over. The blueberries burst while they bake and create these little jammy pockets throughout. When that thing comes out of the oven all puffed up, you’ll get it. This is my go-to when I want to impress someone at breakfast.

    What Makes a Dutch Baby Different?

    Good question.

    It’s all in the technique and what you put in it. This German-style pancake uses way more eggs and way less flour than regular pancakes. That creates a custard-like texture instead of fluffy.

    No baking powder. No baking soda.

    The steam from the eggs and milk? That’s what makes it rise.

    Here’s where the magic happens:

    You pour room-temperature batter into a smoking-hot cast iron skillet with butter. The temperature shock creates steam. The edges puff up while the center sets slower. When you pull it out, it deflates a bit.

    Don’t freak out. That’s supposed to happen.

    Ingredients You’ll Need

    Here’s your shopping list:

    IngredientQuantityNotes
    Unsalted butter4 tablespoons, dividedSplit between batter and skillet
    Whole or 2% milk1/2 cup (125g)Room temperature works best
    All-purpose flour1/2 cup (64g)Measure carefully for best results
    Large eggs4Also best at room temperature
    Granulated sugar3 tablespoons (43g)Adds subtle sweetness
    Pure vanilla extract1 teaspoonEnhances overall flavor
    Fine salt1/4 teaspoonBalances sweetness
    Fresh lemon zestFrom 1 lemonUse a microplane for finest zest
    Fresh blueberries1 cup (154g)Frozen works but may affect rise
    Confectioners’ sugarFor dustingOptional but recommended

    Prep Time: 10 minutes | Cook Time: 15 minutes | Total Time: 25 minutes
    Servings: 4 | Difficulty: Easy

    lemon blueberry dutch baby

    Step-by-Step Instructions for Perfect Results

    Getting Everything Ready

    First thing? Move your oven rack to the center.

    This helps the heat spread evenly around your Dutch baby. Crank that oven to 450°F. I know, I know. That’s hot. But trust me. You need that heat for the dramatic puff.

    Grab your 9- or 10-inch cast iron skillet. Put it on the stovetop over low heat. Let it warm up slowly while you make the batter.

    This gentle warmup prevents your pan from getting shocked. Plus, it starts building the heat you’ll need.

    Making the Batter

    Take 2 tablespoons of butter. Melt it in a small pan.

    Pour that melted butter straight into your blender. Now add everything else on top:

    • Milk
    • Flour
    • Eggs
    • Sugar
    • Vanilla
    • Salt
    • Lemon zest

    Put the lid on tight. Blend on high for 30-45 seconds until it’s completely smooth.

    This blending step is critical.

    Don’t even think about whisking by hand. You’ll get lumps. The blender whips air into the batter while making it silky smooth. You should see a slightly foamy top when it’s ready.

    lemon blueberry dutch baby

    The Cooking Part

    Time to turn up the heat on your skillet. Medium-high.

    Drop in your remaining 2 tablespoons of butter. It should sizzle right away. Swirl the pan around so butter coats everything—bottom and sides.

    Toss your blueberries across the melted butter. Shake the pan gently to spread them out.

    Now here’s the important part.

    Don’t wait. Immediately pour your batter over those berries. You should hear it sizzle when it hits the pan.

    Move that skillet into your hot oven. Set a timer for 15 minutes.

    And here’s the hard part: Don’t open the door.

    I know you want to peek. Resist. Every time you open that door, you let out heat and steam. That stops the rising process.

    The Grand Finale

    After 15 minutes, check it out.

    The edges should be deep golden brown with a puffed rim. The center looks set but softer than the edges. Grab some heavy oven mitts and pull it out.

    Watch what happens next.

    It starts deflating almost immediately. Again—totally normal. While it’s still hot, dust the top with confectioners’ sugar. The heat melts it slightly and creates a beautiful finish.

    lemon blueberry dutch baby

    Cut it into wedges. Serve it right away.

    I drizzle maple syrup over my slice. But you could do fresh berries, whipped cream, or yogurt. Whatever sounds good.

    Why This Actually Works

    Let me break down the science real quick.

    The eggs: That high egg ratio creates structure for rising while keeping the inside custardy.

    The flour: Just enough to hold things together without making it bready or dense.

    The temperature game: Room-temp batter + screaming hot skillet = instant steam. That steam plus hot oven = dramatic puff. The blueberries add moisture and keep the bottom from getting too crispy.

    The lemon zest: Brings brightness without extra liquid. Lemon juice would thin out the batter. Zest gives you pure citrus flavor.

    When Things Go Wrong

    Your Dutch baby didn’t puff up?

    Temperature is usually the problem. Make sure your oven is actually at 450°F. Some ovens lie. An oven thermometer helps.

    Cold eggs and milk straight from the fridge can mess things up too. Let them sit out for 30 minutes before you start. They mix better and react better to heat.

    Got frozen blueberries?

    They work in a pinch. But they release extra water that makes the bottom soggy. If you’re using frozen, thaw them completely. Pat them dry with paper towels before adding to your skillet.

    Other Flavor Ideas

    The lemon-blueberry version is delicious. But this technique works with tons of combinations.

    Try these:

    • Orange zest with cranberries for tang
    • Raspberries with almond extract instead of vanilla
    • Skip the berries, add sliced strawberries and chocolate drizzle after baking
    • Go savory—ditch the sugar and vanilla, top with sautéed mushrooms and herbs
    lemon blueberry dutch baby

    Frequently Asked Questions

    Can I make this Dutch baby ahead of time?

    Not really.

    Dutch babies are best right out of the oven. They deflate fast and lose that dramatic texture as they cool.

    But here’s what you can do:

    Make the batter up to 2 hours ahead. Keep it in the fridge. Let it sit at room temp for 15 minutes before baking. Give it a quick stir before pouring into your hot skillet.

    What if I don’t have a cast iron skillet?

    Cast iron is best because it holds heat really well. That creates the best rise and crispiest edges.

    But you can use other oven-safe skillets around the same size. Heavy-bottomed stainless steel works okay. Try to avoid nonstick pans—they don’t get as hot and might prevent good browning.

    Can I double this recipe for a larger crowd?

    Yes, but you need a bigger skillet. At least 12 inches across.

    The batter needs room to spread and rise.

    Honestly? If you’re feeding a crowd, I’d make two separate Dutch babies one after another instead of doubling in one pan. The second one takes the same amount of time as the first.

    Why did my Dutch baby turn out flat and dense?

    A few things could cause this:

    • Pan wasn’t hot enough before adding batter
    • Oven temperature was too low
    • You opened the door during baking
    • Your eggs are old (fresh eggs create more steam and structure)

    Can I use a different type of flour?

    All-purpose flour gives you the best texture.

    Whole wheat flour makes it heavier and less likely to puff dramatically. Some people have luck with gluten-free all-purpose blends. Results vary by brand. If you’re going gluten-free, look for one with xanthan gum for better structure.

    This Fresh Lemon-Blueberry Dutch baby proves something important: Impressive breakfasts don’t need fancy techniques or hours of work. You’ve got simple ingredients and one skillet. That’s it. The result looks like restaurant brunch but tastes better because you made it. Crispy edges, custardy center, burst blueberries, bright lemon flavor. Every bite is worth it.

    Lemon Blueberry Dutch Baby

    Lemon Blueberry Dutch Baby

    A show-stopping breakfast with crispy puffed edges and a custardy center. Fresh blueberries burst into jammy pockets while lemon zest adds brightness. No flipping required—just blend, pour, and bake.
    Prep Time 10 minutes
    Cook Time 15 minutes
    Total Time 25 minutes
    Servings: 4 servings
    Course: Breakfast, Brunch
    Cuisine: American, German

    Ingredients
      

    • 4 tablespoons unsalted butter divided
    • 1/2 cup whole or 2% milk room temperature works best
    • 1/2 cup all-purpose flour
    • 4 large eggs room temperature
    • 3 tablespoons granulated sugar
    • 1 teaspoon pure vanilla extract
    • 1/4 teaspoon fine salt
    • 1 lemon zest only, use a microplane
    • 1 cup fresh blueberries frozen works but may affect rise
    • confectioners’ sugar for dusting, optional

    Method
     

    1. Move your oven rack to the center position and preheat oven to 450°F. Place a 9- or 10-inch cast iron skillet on the stovetop over low heat to warm up slowly.
    2. Melt 2 tablespoons of butter in a small pan. Pour melted butter into your blender, then add milk, flour, eggs, sugar, vanilla, salt, and lemon zest.
    3. Blend on high for 30-45 seconds until completely smooth with a slightly foamy top. Don’t whisk by hand or you’ll get lumps.
    4. Turn heat under the skillet to medium-high. Add remaining 2 tablespoons butter and swirl to coat bottom and sides. The butter should sizzle immediately.
    5. Toss blueberries into the melted butter and shake pan gently to spread them out.
    6. Immediately pour batter over the berries (it should sizzle when it hits the pan). Transfer skillet to the preheated oven.
    7. Bake for 15 minutes without opening the oven door. The edges should be deep golden brown with a puffed rim and the center should look set.
    8. Remove from oven using heavy oven mitts. The Dutch baby will deflate quickly (this is normal). Dust with confectioners’ sugar while still hot.
    9. Cut into wedges and serve immediately with maple syrup, fresh berries, whipped cream, or yogurt.

    Notes

    Make-Ahead Tip: Batter can be made up to 2 hours ahead and refrigerated. Let sit at room temperature for 15 minutes before baking and give it a quick stir before pouring.
    Equipment Note: Cast iron is best for holding heat and creating crispy edges. Heavy-bottomed stainless steel works okay. Avoid nonstick pans.
    Frozen Blueberries: Thaw completely and pat dry with paper towels before using to prevent a soggy bottom.
    Temperature is Key: Make sure oven is actually at 450°F (use an oven thermometer). Let eggs and milk come to room temperature for best results.
  • Homemade Garlic Bread Recipe (Easy & Crispy!)

    Homemade Garlic Bread Recipe (Easy & Crispy!)

    This homemade garlic bread is perfectly crispy on the edges and soft inside. With aromatic roasted garlic, fresh herbs, and melted butter, it’s the ideal side dish. Serve it with pasta, soups, or enjoy it on its own!

    Prep Time: 10 minutes | Cook Time: 15 minutes | Total Time: 25 minutes
    Servings: 8 slices | Difficulty: Easy

    My Journey to Perfect Garlic Bread

    Want to know something embarrassing?

    The first time I tried making garlic bread from scratch, it was an absolute disaster. Burnt edges. Raw center. And the garlic flavor? Barely there.

    My family tried to be polite. They pushed it around their plates while making small talk. But I could see the disappointment in their eyes.

    Right then, I made myself a promise. I would figure this out.

    And you know what? After about two dozen attempts (and way too many trips to the bakery), I finally cracked the code.

    Here’s what I learned…

    The secret isn’t just throwing butter on bread and crossing your fingers. It’s actually about three things: choosing the right bread, nailing that butter-to-garlic ratio, and getting your oven temperature just right.

    These days? This garlic bread shows up at our dinner table at least twice a week. My kids beg for it every single pasta night. And honestly, I don’t blame them one bit.

    It’s become our family’s thing.

    homemade garlic bread

    Why This Recipe Actually Works

    Let’s be real for a second.

    Store-bought frozen garlic bread? It can’t hold a candle to homemade. Those packages are loaded with preservatives and artificial flavors. The texture is always disappointing.

    But making it yourself? Takes maybe 10 minutes of actual work.

    The difference comes down to ingredients. Real butter melts into every nook and cranny of the bread. Fresh garlic gives you that incredible punch of flavor without any bitter aftertaste. And the herbs? They add this brightness that frozen versions just don’t have.

    Plus, this recipe is super forgiving.

    Forgot to soften your butter? I’ve got a quick fix for that.

    Want extra cheese? Go crazy.

    Prefer less garlic? Totally fine—adjust it however you want.

    Everything You Need (And Why Each Ingredient Matters)

    Let me walk you through what you’ll need and why each thing is important.

    The Bread Foundation

    Your bread choice? It determines everything.

    I always use a 1-pound Italian or French loaf. But here’s the key—not a baguette. Baguettes get way too hard and crusty when you bake them this way.

    You want bread that’s sturdy enough to hold all that butter. But soft enough that you can actually bite through it without breaking a tooth.

    The loaf should be about 12-14 inches long. Look for something with a moderately soft interior and a light crust. That’s what creates the perfect texture contrast after baking.

    homemade garlic bread

    The Butter Base

    I use 1/2 cup of softened unsalted butter.

    Why unsalted? It gives you complete control over the salt level. But listen—salted butter works fine too. Just cut back on the extra salt a bit.

    Now, when I say “softened,” I mean room temperature. Not melted.

    The butter should be spreadable but still hold its shape. This consistency lets it cream properly with the garlic and herbs.

    Forgot to soften your butter?

    Here’s my trick: Cut it into small cubes. Let it sit for 10 minutes. It’ll soften way faster than leaving out a whole stick.

    The Garlic Star

    Fresh garlic is non-negotiable.

    I use 4 cloves, finely minced. And I’m not talking about the jarred stuff or garlic powder. Those just can’t replicate the complexity and aroma of fresh garlic.

    Mince your garlic as finely as you possibly can. Large chunks burn really easily and create these unpleasant bitter spots that ruin everything.

    I usually grab my garlic press for consistency. But a sharp knife works great too.

    Four cloves might sound like a lot. But here’s the thing—baking really mellows out garlic’s intensity. What you end up with is this rich, sweet, roasted garlic flavor. No overwhelming heat at all.

    Fresh Herbs for Brightness

    One tablespoon of finely chopped fresh parsley adds color and freshness.

    Those little green flecks look beautiful. And they provide this subtle herbaceous note that ties everything together.

    Fresh parsley is way better than dried here. Dried parsley just doesn’t have that vibrant flavor. It can even taste a bit dusty.

    If you absolutely have to substitute? Use 1 teaspoon dried.

    I also love throwing on extra parsley and chives after baking. The fresh herbs on top add another flavor layer. Plus they make it look like something you’d get at a fancy restaurant.

    homemade garlic bread

    Seasoning Perfection

    Just 1/8 teaspoon of sea salt brings everything together.

    Sea salt has a cleaner taste than table salt. But if you’re using salted butter? You might want to skip the extra salt entirely.

    Here’s a pro move: Taste your butter mixture before spreading it on the bread. This way you know it’s properly seasoned before it goes in the oven.

    Optional Cheese Addition

    Want to take this from great to absolutely extraordinary?

    Add cheese.

    You’ve got two excellent options:

    Parmesan cheese (1/4 cup freshly grated): This adds a nutty, salty depth that’s incredible. Grate it yourself from a wedge for maximum flavor.

    Mozzarella cheese (1/2 cup shredded): Creates that melty, stretchy goodness. Perfect if you’re a serious cheese lover.

    I usually sprinkle the cheese on during the last 2 minutes of baking. This prevents it from burning while still getting it perfectly melted.

    Your Complete Ingredient List

    IngredientQuantityNotes
    Italian or French loaf1 poundNot baguette; needs soft interior
    Unsalted butter1/2 cupMust be softened, not melted
    Fresh garlic cloves4 clovesFinely minced; no substitutes
    Fresh parsley1 tablespoonFinely chopped; plus extra for garnish
    Sea salt1/8 teaspoonAdjust if using salted butter
    Parmesan cheese1/4 cupOptional; freshly grated preferred
    Mozzarella cheese1/2 cupOptional; shredded, not fresh
    Fresh chivesFor garnishOptional; finely chopped

    What You’ll Need (Equipment-Wise)

    Before we jump in, let me go over the tools you’ll need.

    You probably have everything already. But I’ll mention a few things that make this way easier.

    A large baking sheet is essential. Line it with parchment paper or aluminum foil for easy cleanup. Parchment prevents sticking better, but foil works just fine.

    You’ll need a serrated bread knife for slicing. Regular knives just crush the bread’s interior. Serrated knives cut cleanly through the crust without squishing everything.

    A small mixing bowl for the butter mixture. A fork or small spatula to spread it on the bread.

    That’s honestly all you need.

    homemade garlic bread

    How to Make It (Step by Step)

    Step 1: Preheat and Prep (2 minutes)

    Crank your oven to 425°F (220°C).

    This high temperature is what creates those crispy edges while keeping the center nice and soft.

    Line your baking sheet with parchment paper or foil. Set it aside while you get the bread ready.

    Step 2: Slice the Bread (1 minute)

    Grab your serrated knife. Slice the loaf in half lengthwise.

    You want two equal halves, cut horizontally right through the middle.

    Place both halves cut-side up on your prepared baking sheet. Make sure they’re laying flat with the cut surface completely exposed.

    Step 3: Make the Garlic Butter (3 minutes)

    In your small bowl, throw together the softened butter, minced garlic, chopped parsley, and sea salt.

    Mix it thoroughly with a fork until everything’s evenly distributed.

    The mixture should look creamy and pale yellow with little green parsley flecks throughout. You want every single bite of bread to have garlic and herbs in it.

    Don’t rush this part. Proper mixing means consistent flavor across every slice.

    Step 4: Spread the Magic (2 minutes)

    Now for the fun part.

    Spread that garlic butter mixture evenly over both bread halves. Cover the entire cut surface, including the edges.

    Use the back of your spoon or a small spatula. Press the butter gently into the bread’s surface. This helps it absorb rather than just sitting on top.

    Don’t leave any dry spots. The edges need butter too, or they’ll burn while everything else is cooking.

    Step 5: Bake to Perfection (12-15 minutes)

    Slide that baking sheet into your preheated oven.

    Bake for 12-15 minutes until the edges turn golden brown.

    Watch it during the last few minutes. Ovens can vary a lot in how accurate they are. You’re looking for golden edges and a lightly toasted surface.

    Adding cheese? Sprinkle it on during the last 2 minutes of baking. This melts it perfectly without burning.

    Step 6: Cool and Slice (2 minutes)

    Pull the baking sheet out of the oven.

    Let the bread cool for 2 minutes. Trust me on this—it’s extremely hot right now.

    Using your serrated knife, cut each half into 1-inch slices. You should get about 8 slices total from a standard loaf.

    Want to get fancy? Garnish with extra chopped parsley and chives.

    Serve it immediately while it’s still warm. That’s when it’s at its absolute best.

    Tips That’ll Make You Look Like a Pro

    Temperature Control

    Oven temperature affects the texture in a huge way.

    Too low? Your bread turns oily without getting crispy.

    Too high? The garlic burns before the bread even toasts.

    425°F is the sweet spot. But if your oven runs hot, dial it back to 400°F. An oven thermometer is super helpful for checking accuracy.

    Crispiness Customization

    Everyone likes their garlic bread different.

    Here’s how to adjust:

    For softer bread: Bake for only 10-12 minutes. Or wrap the bread in aluminum foil before baking.

    For crispier bread: Bake for 15-17 minutes. Just watch it carefully during those last few minutes so it doesn’t burn.

    For extra crispy: After baking, stick it under the broiler for 1-2 minutes. But stay right there watching it. Broilers burn things fast.

    Garlic Intensity Adjustment

    Four cloves give you robust garlic flavor.

    Sensitive to garlic? Start with 3 cloves.

    Love garlic? Go up to 5 or even 6 cloves.

    Want something milder? Try roasted garlic instead. Roast whole garlic cloves first, then mash them up and mix into the butter. It creates this sweet, caramelized flavor without any sharpness.

    Butter Spreading Technique

    Room temperature butter spreads easily without tearing the bread.

    If your butter’s too cold? You’ll end up ripping the bread’s surface.

    If your butter’s too soft (almost melted)? Pop the mixture in the fridge for 5 minutes. This firms it up for better spreading.

    And here’s something important: Spread butter all the way to the edges.

    The edge pieces are actually the best ones. Don’t skimp on them.

    Mistakes to Watch Out For

    Using Pre-Minced Garlic

    That jarred minced garlic in your fridge?

    It contains preservatives and lacks fresh garlic’s aromatic oils. The flavor is flat and kind of metallic.

    Always use fresh cloves. I promise it’s worth it.

    Melting the Butter

    Melted butter just runs off the bread and pools on your baking sheet.

    Softened butter stays put. It absorbs into the bread properly.

    Big difference.

    Skipping the Preheat

    Putting bread in a cold oven? That results in greasy, unevenly toasted bread.

    Always preheat. It ensures proper crisping from the start.

    Overcrowding the Pan

    Leave some space between the bread halves.

    Air circulation is what ensures even browning on all sides.

    What to Serve This With

    This garlic bread pairs beautifully with so many dishes.

    Here are my go-to combinations:

    Italian Classics: Serve it with spaghetti, lasagna, or fettuccine alfredo. The bread soaks up extra sauce like a dream.

    Soups: It’s perfect alongside tomato soup, minestrone, or creamy chicken soup. Use it for dipping.

    Salads: Balance out a light Caesar salad or garden salad with this rich, buttery bread.

    Standalone Snack: Real talk? It’s delicious on its own. I’ve definitely made entire lunches of just garlic bread. No regrets.

    How to Store Your Garlic Bread

    Want to keep your garlic bread delicious for days?

    Here’s exactly how to do it.

    Room Temperature Storage

    Cover leftover garlic bread tightly with aluminum foil or plastic wrap.

    Store it at room temperature for 1-2 days maximum.

    Room temperature keeps the best texture. Refrigeration? That makes bread tough and dried out. Not good.

    Before serving it again, reheat in a 350°F oven for 5-7 minutes. Wrap it in foil to prevent over-browning.

    Freezing for Longer Storage

    Garlic bread freezes beautifully.

    This is actually my favorite meal prep trick for crazy busy weeknights.

    Before Baking: Prepare the bread all the way through Step 4 (after spreading that garlic butter). Place the halves in a freezer-safe bag. They’ll keep for up to 3 months.

    When you’re ready to eat? Bake directly from frozen. Just add 3-5 extra minutes to the baking time.

    After Baking: Let your baked garlic bread cool completely. Wrap it tightly in aluminum foil, then stick it in a freezer bag. It’ll keep for up to 2 months.

    Reheat from frozen in a 350°F oven for 10-12 minutes. The foil prevents burning while everything heats through.

    Fun Variations to Try

    Once you’ve got the basic recipe down, these twists are amazing.

    Cheesy Garlic Bread Supreme

    Use both parmesan and mozzarella for ultimate cheesiness.

    Mix 2 tablespoons of parmesan right into the butter. Then sprinkle mozzarella on top during the last 2 minutes.

    It’s ridiculously good.

    Herb-Loaded Version

    Add 1 teaspoon each of dried oregano, basil, and thyme to the butter mixture. This creates that Italian seasoning-style garlic bread.

    Fresh rosemary (1 tablespoon minced) adds an elegant, aromatic twist. Rosemary pairs especially well with roasted meats.

    Spicy Garlic Bread

    Mix 1/4 teaspoon red pepper flakes into the butter.

    Want more heat? Add a pinch of cayenne pepper.

    Or brush the bread with chili-infused olive oil before spreading the garlic butter.

    Roasted Garlic Version

    Roast a whole garlic head at 400°F for 40 minutes. Squeeze out those soft cloves and mash them into the butter.

    Roasted garlic gives you this sweet, caramelized flavor without any sharpness. It’s completely different from raw garlic.

    Vegan Garlic Bread

    Replace regular butter with vegan butter. Everything else stays the same.

    For cheesy vegan garlic bread? Use dairy-free mozzarella or parmesan alternatives. They work surprisingly well.

    Perfect Pairings

    Wine Pairings

    Light, crisp white wines complement garlic bread’s richness beautifully.

    Try Pinot Grigio, Sauvignon Blanc, or Vermentino.

    Prefer red wine? Choose medium-bodied options like Chianti or Sangiovese. These won’t overpower the garlic.

    Complete Meal Ideas

    Want to create a full Italian feast with garlic bread as the star side?

    Here are my favorite combinations:

    • Spaghetti carbonara with garlic bread and Caesar salad
    • Chicken parmesan with garlic bread and roasted vegetables
    • Minestrone soup with garlic bread and a simple green salad
    • Shrimp scampi with garlic bread and steamed broccoli

    Appetizer Transformation

    Cut the bread into smaller pieces (about 2-inch squares) before baking.

    Serve as an appetizer with marinara sauce for dipping.

    Want to get fancy? Top each piece with a cherry tomato half before baking. Instant bruschetta-style appetizers.

    Your Questions Answered

    Can I use garlic powder instead of fresh garlic?

    Fresh garlic gives you way better flavor. But garlic powder works in a pinch.

    Use 1 teaspoon of garlic powder mixed into the softened butter. Just know that the flavor won’t be as complex or aromatic.

    My garlic bread burned on top but is raw inside. What happened?

    Your oven temperature is too high.

    Reduce it to 400°F and bake a bit longer. Also, make sure your rack is in the center of the oven. Not too close to the top heating element.

    Can I make the garlic butter mixture ahead of time?

    Absolutely!

    Mix the butter, garlic, parsley, and salt up to 3 days ahead. Store it covered in the refrigerator. Just bring it to room temperature before spreading on bread.

    You can even freeze the butter mixture for up to 2 months. Thaw it overnight in the refrigerator when you’re ready to use it.

    What’s the best way to reheat leftover garlic bread?

    Wrap it in aluminum foil and heat at 350°F for 5-7 minutes.

    The foil prevents the edges from over-browning while the center warms through.

    Whatever you do, never microwave garlic bread. It becomes rubbery and soggy. Just trust me on this.

    Can I use a baguette instead of Italian/French bread?

    Baguettes work, but they create a different texture.

    They’re crustier and denser. This results in harder garlic bread overall.

    If you’re using a baguette, reduce baking time by 2-3 minutes. And watch it carefully to prevent it from getting too hard.

    Here’s the Thing

    This garlic bread recipe has become my go-to for almost every dinner.

    It’s simple enough for weeknight meals. But impressive enough for when you have people over.

    The key? Quality ingredients. Fresh garlic, real butter, and good bread. These simple things combine into something truly special.

    And listen—don’t be intimidated if you’ve never made garlic bread before.

    This recipe is genuinely foolproof. Follow the steps, watch the baking time, and you’ll get perfect results.

    Your family’s going to request this constantly. Mine sure does. I’ve honestly lost count of how many loaves I’ve made over the years.

    Make it tonight alongside your favorite pasta dish.

    You’ll finally understand why homemade garlic bread beats store-bought every single time.

    Pro Tip: Double the garlic butter mixture and store half in the freezer. You’ll always have it ready for those impromptu garlic bread cravings. (And trust me, those cravings happen a lot.)

    Enjoy this delicious, aromatic garlic bread fresh from your oven. It’s about to become your new favorite side dish.

    Homemade Garlic Bread

    Homemade Garlic Bread

    Perfectly crispy on the edges and soft inside, this homemade garlic bread features aromatic roasted garlic, fresh herbs, and melted butter. It’s the ideal side dish for pasta, soups, or enjoyed on its own!
    Prep Time 10 minutes
    Cook Time 15 minutes
    Total Time 25 minutes
    Servings: 8 slices
    Course: Side Dish
    Cuisine: Italian
    Calories: 180

    Ingredients
      

    • 1 pound Italian or French loaf 12-14 inches long, not baguette
    • 1/2 cup unsalted butter softened, not melted
    • 4 cloves fresh garlic finely minced
    • 1 tablespoon fresh parsley finely chopped, plus extra for garnish
    • 1/8 teaspoon sea salt adjust if using salted butter
    Optional Toppings
    • 1/4 cup Parmesan cheese freshly grated
    • 1/2 cup mozzarella cheese shredded
    • fresh chives finely chopped, for garnish

    Method
     

    1. Preheat your oven to 425°F (220°C). Line a large baking sheet with parchment paper or aluminum foil and set aside.
    2. Using a serrated knife, slice the loaf in half lengthwise. Place both halves cut-side up on the prepared baking sheet.
    3. In a small bowl, combine the softened butter, minced garlic, chopped parsley, and sea salt. Mix thoroughly with a fork until evenly distributed and creamy.
    4. Spread the garlic butter mixture evenly over both bread halves, covering the entire cut surface including the edges. Press gently into the bread so it absorbs.
    5. Bake for 12-15 minutes until the edges turn golden brown. If adding cheese, sprinkle it on during the last 2 minutes of baking.
    6. Remove from oven and let cool for 2 minutes. Cut each half into 1-inch slices (about 8 slices total). Garnish with extra parsley and chives if desired. Serve immediately while warm.

    Notes

    Storage: Cover tightly with foil and store at room temperature for 1-2 days. Reheat in a 350°F oven for 5-7 minutes wrapped in foil.
    Freezing: Before baking – prepare through Step 4, freeze in freezer bag for up to 3 months. Bake from frozen, adding 3-5 extra minutes. After baking – cool completely, wrap in foil, freeze for up to 2 months. Reheat from frozen at 350°F for 10-12 minutes.
    Tips: Always use fresh garlic (not jarred). Softened butter spreads better than melted. Watch carefully during final minutes to prevent burning. Spread butter to the edges for best results.
  • Apple Cake with Caramel Glaze Recipe (Easy & Moist)

    Apple Cake with Caramel Glaze Recipe (Easy & Moist)

    It’s a cool fall afternoon. Your oven is on. And the smell of apples and cinnamon fills every corner of your house.

    That’s exactly what happens when I make this apple cake with caramel glaze. And honestly? It’s become the dessert I turn to when I want my home to feel warm and cozy.

    Here’s what makes it different from other apple cakes out there.

    Most recipes give you a regular cake with a few sad apple pieces here and there. Not this one. This cake is absolutely loaded with apples. I’m talking three whole pounds of them.

    The texture? Almost like a pudding. Super moist. The apples practically melt in your mouth.

    apple cake with caramel glaze

    How I Found This Recipe

    I stumbled on this recipe a few years back.

    Was hunting for the perfect fall dessert. You know, something that screams autumn but doesn’t require a culinary degree to pull off.

    When I first read it, I literally did a double-take. Three pounds of apples? For one cake? Had to be a typo, right?

    Wrong.

    I made it anyway. And the moment I took my first bite, everything clicked. The “cake” part is really just there to hold all those gorgeous apple chunks together. It’s more like an apple dessert that happens to have cake batter in it.

    Mind. Blown.

    Why This Recipe Works Every Time

    The best part?

    You don’t need fancy equipment. No stand mixer required (though you can use one if you want). Just a big bowl, some measuring cups, and a 9×13-inch pan.

    The most time you’ll spend is peeling and chopping apples. But even that’s kind of therapeutic. Put on some music, pour yourself a cup of coffee, and get to work.

    Now let’s talk about the caramel glaze.

    This isn’t some wimpy drizzle. This is a rich, buttery, brown-sugar-and-cream situation that soaks into every single crevice of the cake. It keeps the cake moist for days. (If it lasts that long in your house, which… good luck with that.)

    apple cake with caramel glaze

    I’ve brought this cake to:

    • Family dinners
    • Holiday parties
    • Potlucks
    • Random Tuesday nights when I needed comfort food

    Every single time, people ask for the recipe. And every single time, they’re shocked when I tell them how easy it is.

    The combo of tart Granny Smith apples, warm spices, crunchy pecans, and that sweet caramel?

    Chef’s kiss.

    My Favorite Thing About This Cake

    It’s basically foolproof.

    Even if you overbake it a little (been there), all those apples keep it from drying out. Actually, here’s a little secret: it tastes even better the next day. The flavors get cozy with each other overnight.

    So I usually bake it the night before I need it. Then I warm it up just a bit and pour the glaze on right before serving. Makes me look like I have my life together, which is always a win.

    Whether you bake all the time or you’re just starting out, this cake is going to become your new favorite. It’s got everything you want in a fall dessert: warm flavors, amazing smells, and that “wow, you made this?” factor.

    Let me show you how to make it.


    What You’ll Need (And How to Make It)

    The Ingredient Breakdown

    IngredientQuantityWhy It Matters
    Light brown sugar1 cup, packedKeeps the cake moist, adds that caramel-y depth
    Granulated sugar1 cupSweetness and structure
    Vegetable oil1½ cupsThis is your moisture MVP
    Large eggs3Room temp is better if you remember
    All-purpose flour3 cupsSpoon it in, don’t pack it
    Baking soda1 teaspoonMakes it rise just right
    Ground cinnamon2 teaspoonsFresh stuff is worth it
    Ground nutmeg½ teaspoonGrate it fresh if you can
    Salt½ teaspoonBalances out all that sweetness
    Vanilla extract2¼ teaspoonsGo for the real stuff, not imitation
    Granny Smith apples3 poundsThat’s about 6-7 medium apples
    Pecans1¼ cupsChopped, but not too fine
    For the Glaze:
    Unsalted butter4 tablespoonsHalf a stick
    Granulated sugar¼ cupBuilding that caramel
    Light brown sugar¼ cupMore caramel flavor
    Heavy cream½ cupMakes it silky smooth
    Salt1 pinchTrust me on this
    apple cake with caramel glaze

    Let’s Get Baking

    First Things First

    Crank your oven to 325°F.

    Yeah, I know that seems low. But trust the process. This lower temp means the edges won’t burn while the center is still baking.

    Butter your 9×13-inch pan. Get in those corners. I also hit it with a light dusting of flour. Better safe than sorry when it comes to stuck cake.

    Making the Batter

    Grab your biggest bowl.

    Dump in both sugars and the oil. Beat it with your mixer for about two minutes. It’ll get lighter and fluffier as you go.

    Now add your eggs. One at a time. Beat well after each one. This is where you’re building the structure of your cake, so don’t rush it.

    In another bowl, whisk your flour, baking soda, cinnamon, nutmeg, and salt together. This makes sure all your spices and leavening get distributed evenly.

    Here’s the thing about adding the flour.

    Do it in three batches. Mix on low. Stop as soon as you don’t see dry flour anymore. Overmixing = tough cake. And nobody wants that.

    Stir in the vanilla.

    Now comes the fun part.

    The Apple Situation

    Time to peel, core, and chop those apples.

    Cut them into half-inch pieces. Not bigger (they won’t cook through). Not smaller (they’ll turn to mush). Half-inch is the sweet spot.

    Three pounds sounds like a lot. Because it is a lot. You’ll have a mountain of apples on your cutting board. It’s totally normal.

    apple cake with caramel glaze

    Dump all the apples and pecans into your batter.

    Now here’s where you might panic a little.

    The batter is THICK. Like, really thick. You’ll think there’s no way there’s enough batter to hold all these apples together.

    But there is.

    Just keep folding. Use a good sturdy spoon or spatula. Be patient. Eventually everything will come together and every apple piece will have some batter clinging to it.

    Into the Oven

    Scrape everything into your pan. Spread it out as best you can. The pan’s going to be pretty full.

    Pop it in the oven. Set a timer for 60 minutes.

    At that point, stick a toothpick in the center. If it comes out clean (or with just a couple moist crumbs), you’re done. If not, give it another 10-15 minutes.

    Total bake time is usually 60-75 minutes.

    Pull it out. Let it hang out in the pan while you make the glaze. The cake needs to still be warm for what comes next.

    Making That Gorgeous Glaze

    Get a medium saucepan going on medium-low heat.

    Melt your butter. Add both sugars and that pinch of salt. Stir it around until everything’s combined. It’ll look grainy and weird at first. That’s fine.

    Let it cook for about two minutes. Keep stirring now and then.

    Pour in the cream. Turn the heat up just a touch. Bring it to a gentle boil, stirring the whole time.

    Once it’s boiling, let it go for exactly two minutes. Keep stirring. You’ll see it thicken up and turn this beautiful golden color.

    Off the heat immediately.

    The Grand Finale

    Grab a wooden skewer or toothpick. Poke holes ALL over the top of your warm cake. This gives the glaze somewhere to sink into.

    Pour that warm glaze right over the top. Don’t hold back. Let it pool in the holes. Let it run down the sides.

    Give it at least 30 minutes to cool before you cut into it.

    You can serve it warm. Or at room temp. Both are amazing. I like to add a scoop of vanilla ice cream on the side, but that’s just me.


    My Best Tips (Plus Answers to Your Questions)

    Things I’ve Learned Making This Cake

    The apple variety matters.

    Granny Smiths are my go-to. They’re tart, which balances out all the sugar. Plus they hold their shape during the long bake time.

    That said, I’ve used Pink Lady apples before. Even Honeycrisp. They make the cake sweeter, which some people love. Just depends on your taste.

    Don’t freak out about the thick batter.

    I know I already mentioned this, but it bears repeating. When you add those apples, the batter is going to seem impossibly thick. You might be tempted to add more oil or some milk.

    Don’t.

    That thickness is what makes this cake work. Just keep folding. It’ll come together.

    Timing is everything with the glaze.

    Both the cake and the glaze need to be warm when you put them together. That’s when the magic happens. The glaze soaks in instead of just sitting on top.

    If your glaze cools down too much and gets thick? Just warm it back up gently before pouring.

    This cake gets better with age.

    Not kidding. Day two is better than day one. The flavors meld together. The moisture distributes evenly. It’s like the cake needs a night to think about what it wants to be.

    Keep it covered on your counter for up to three days. Or stick it in the fridge for up to a week.

    Your Questions Answered

    Can I use a different pan?

    Sure can.

    A tube pan works great. So does a bundt pan. The baking time stays about the same, but start checking at the 60-minute mark. Look for the cake pulling away slightly from the edges.

    What if I don’t have heavy cream?

    Whole milk will work in a pinch. The glaze just won’t be quite as rich and thick. Half-and-half is the perfect middle ground if you’ve got it.

    Can I make this ahead?

    Absolutely.

    Bake the cake up to two days before you need it. Keep it covered at room temp. Then make the glaze fresh and pour it on right before serving.

    This actually makes your life way easier if you’re entertaining.

    Help! My apples always sink to the bottom.

    Here’s a trick: toss your diced apples with a tablespoon of flour before adding them to the batter.

    But honestly? The super thick batter usually keeps them suspended just fine on its own.

    What about other nuts?

    Walnuts work great. They’ve got a slightly earthier flavor than pecans.

    Or skip the nuts completely if allergies are an issue. The cake is still delicious without them, just missing that nice crunch.


    Look, this apple cake with caramel glaze is comfort food at its absolute best.

    It’s the kind of dessert that makes your house smell amazing. That makes people smile when they take a bite. That disappears faster than you think it will.

    Try it this weekend. I’m betting it becomes your new fall tradition.

    Apple Cake with Caramel Glaze

    Apple Cake with Caramel Glaze

    An incredibly moist apple cake loaded with 3 pounds of apples and topped with a rich caramel glaze. This easy fall dessert has a pudding-like texture and gets even better the next day.
    Prep Time 30 minutes
    Cook Time 1 hour 15 minutes
    Cooling Time 30 minutes
    Total Time 1 hour 45 minutes
    Servings: 12 servings
    Course: Dessert
    Cuisine: American
    Calories: 485

    Ingredients
      

    For the Cake
    • 1 cup light brown sugar packed
    • 1 cup granulated sugar
    • cups vegetable oil
    • 3 large eggs room temperature
    • 3 cups all-purpose flour
    • 1 teaspoon baking soda
    • 2 teaspoons ground cinnamon
    • ½ teaspoon ground nutmeg
    • ½ teaspoon salt
    • teaspoons vanilla extract
    • 3 pounds Granny Smith apples peeled, cored, and chopped into ½-inch pieces (about 6-7 medium apples)
    • cups pecans chopped
    For the Caramel Glaze
    • 4 tablespoons unsalted butter
    • ¼ cup granulated sugar
    • ¼ cup light brown sugar
    • ½ cup heavy cream
    • 1 pinch salt

    Method
     

    Prepare the Pan and Oven
    1. Preheat your oven to 325°F (165°C).
    2. Butter a 9×13-inch baking pan and lightly dust with flour, making sure to get into the corners.
    Make the Cake Batter
    1. In a large bowl, beat together both sugars and vegetable oil for about 2 minutes until lighter and fluffier.
    2. Add eggs one at a time, beating well after each addition.
    3. In a separate bowl, whisk together flour, baking soda, cinnamon, nutmeg, and salt.
    4. Add the flour mixture to the wet ingredients in three batches, mixing on low speed just until no dry flour is visible. Do not overmix.
    5. Stir in the vanilla extract.
    6. Fold in the chopped apples and pecans. The batter will be very thick – this is normal. Keep folding until every apple piece is coated with batter.
    Bake the Cake
    1. Scrape the batter into the prepared pan and spread evenly.
    2. Bake for 60-75 minutes, or until a toothpick inserted in the center comes out clean or with just a few moist crumbs.
    3. Remove from oven and let the cake rest in the pan while you make the glaze. The cake should still be warm.
    Make the Caramel Glaze
    1. In a medium saucepan over medium-low heat, melt the butter.
    2. Add both sugars and salt, stirring until combined. Cook for about 2 minutes, stirring occasionally.
    3. Pour in the heavy cream and increase heat slightly. Bring to a gentle boil, stirring constantly.
    4. Once boiling, continue cooking for exactly 2 minutes while stirring. The glaze will thicken and turn golden. Remove from heat immediately.
    Finish the Cake
    1. Using a wooden skewer or toothpick, poke holes all over the top of the warm cake.
    2. Pour the warm caramel glaze over the cake, letting it soak into the holes and run down the sides.
    3. Let the cake cool for at least 30 minutes before cutting. Serve warm or at room temperature. Optional: serve with vanilla ice cream.

    Notes

    Storage: Keep covered at room temperature for up to 3 days, or refrigerate for up to 1 week. The cake tastes even better the next day!
    Make Ahead: Bake the cake up to 2 days in advance and store covered at room temperature. Make the glaze fresh and pour it on right before serving.
    Apple Varieties: Granny Smith apples are recommended for their tartness and ability to hold shape. Pink Lady or Honeycrisp can be substituted for a sweeter cake.
    Pan Options: A tube pan or bundt pan can be used instead of a 9×13-inch pan. Baking time remains the same – check at 60 minutes.
    Nut-Free Option: Pecans can be omitted or replaced with walnuts.
    Cream Substitute: Whole milk or half-and-half can replace heavy cream, though the glaze will be slightly less rich.
  • Easy Lemon Poppy Seed Bread with Glaze Recipe

    Easy Lemon Poppy Seed Bread with Glaze Recipe

    You know that moment when lemon and poppy seeds come together? Pure magic.

    This lemon poppy seed bread is everything you want in a quick bread. Tender. Moist. Bursting with bright citrus flavor. And that sweet glaze on top? It takes things to another level.

    I’ve been baking quick breads for years now. This one? It’s become my go-to.

    The best part? The whole process is super simple. But when you serve it, people think you slaved away in the kitchen for hours. Even better—the smell will pull everyone into your kitchen before it’s done cooling.

    lemon poppy seed bread

    Why this recipe works so well

    The texture is perfect. Sour cream and melted butter team up to create the most tender crumb. Then those little poppy seeds add these amazing pockets of texture.

    Fresh citrus in every bite. Real lemon zest and juice make all the difference. And here’s my secret—almond extract. Just a touch. People always ask what makes it taste so good.

    It’s beginner-friendly. Two bowls. A whisk. Your hands. That’s it. The mixing takes maybe 15 minutes tops.

    Serve it anytime. Morning coffee? Yes. Afternoon snack? Absolutely. Fancy it up with glaze for dessert? You bet.

    It just works. I’ve tested this multiple times to nail the ratios. The milk-soaked poppy seeds? That’s the trick. Room temperature ingredients? Non-negotiable.

    Let’s talk ingredients

    Poppy seeds need to be fresh. Look for that dark blue-grey color. Check the date on the package. Old seeds taste… well, old.

    Fresh lemons only. Grab 2-3 medium lemons. You’ll need both zest and juice. Never use bottled lemon juice. Never.

    Almond extract gives you that bakery vibe. It plays so well with lemon. Not a fan? Vanilla works great too.

    Unsalted butter needs a minute to cool after melting. You don’t want scrambled eggs in your batter. Trust me on this.

    Whole milk or low-fat—either works. Just make sure it’s room temperature. Cold milk throws everything off.

    Sour cream should be full-fat. The texture comes out better. Greek yogurt can pinch hit, but the flavor changes a bit.

    lemon poppy seed bread

    Want to switch things up?

    Throw in some berries. About 3/4 cup of blueberries or raspberries. The tartness? Perfect match for lemon.

    Add crunch with nuts. Chop up 1/2 cup of almonds or walnuts. Goes great with the almond extract.

    Go tropical. Mix in 1/3 cup shredded coconut. Takes you straight to paradise.

    Make muffins instead. Fill a 12-cup tin. Bake at 400°F for 16-18 minutes. Done. Perfect for busy mornings.

    Try mini loaves. Two 5×3 inch pans. About 30 minutes in the oven. These make amazing gifts.

    Need it dairy-free? Swap in dairy-free milk and sour cream. Cup-for-cup gluten-free flour works too. The texture will be a touch denser, but still delicious.

    Here’s how to make it

    Start with those poppy seeds.

    Whisk them with milk in a small bowl. Then walk away. Let them sit for 15 minutes. This step matters more than you think.

    While you’re waiting, crank your oven to 350°F. Line an 8×4 inch loaf pan with parchment paper. Let the edges hang over—makes it way easier to lift out later.

    Mix your dry stuff.

    Flour, baking powder, salt. Whisk it in a medium bowl. Set it aside.

    Now for the fun part.

    Here’s a trick I learned years ago. Put your sugar and lemon zest in a large bowl. Use your fingers to rub them together. Really work it. This releases all those lemon oils. Your sugar will smell incredible.

    Add the wet ingredients.

    Crack in those eggs. Whisk them with your lemon sugar. Pour in the melted butter. Add lemon juice and almond extract. Mix it all up.

    Now dump in the sour cream and that poppy seed-milk mixture. Whisk again until everything looks smooth and thick. That thick texture? Exactly what you want.

    Bring it together.

    Pour your dry ingredients into the wet bowl. Grab a silicone spatula. Fold everything together gently.

    Stop the second you don’t see dry flour anymore.

    Over-mixing is the enemy here. It makes dense, tough bread. Nobody wants that.

    Time to bake.

    Pour the batter into your pan. It’ll be thick but spreadable. Slide it into the oven. Set your timer for 45 minutes.

    Check it with a toothpick. It should come out with just a few moist crumbs. If it’s still wet, give it 5 more minutes.

    Let the bread chill in the pan for 10 minutes. Then use that parchment paper to lift it out. Move it to a wire rack.

    Let it cool completely before glazing. If you glaze it warm, it’ll just melt right in.

    The glaze is easy.

    Whisk confectioners’ sugar with lemon juice. Start with 1 tablespoon of juice. That gives you thick glaze. Want it thinner and drippy? Add another tablespoon.

    Pour it over your cooled bread. Give it 5 minutes to set. Then slice and dig in.

    Things I’ve learned the hard way

    Temperature is everything.

    Room temperature ingredients mix smooth. They create even texture throughout. Cold sour cream? It’ll clump up and refuse to blend in.

    Get a kitchen scale if you can.

    Weighing flour gives you consistent results every single time. Too much flour = dry bread. Simple as that.

    Don’t skip the poppy seed soak.

    Those seeds have tough outer shells. Soaking softens them up. Releases their flavor too. You’ll taste the difference.

    That finger rub technique is gold.

    When you rub lemon zest into sugar, you release oils you’d miss otherwise. I do this with every citrus recipe now.

    Fresh juice or nothing.

    Bottled lemon juice tastes flat. Fake. Fresh-squeezed brings brightness and depth you can’t fake.

    See a crack? Good.

    That crack down the center means your bread rose right. The top sets first as it bakes. Then the center keeps rising and—crack. It’s totally normal. Actually, it’s a sign of perfectly baked bread.

    lemon poppy seed bread

    How to store it

    Room temperature works great.

    Keep it in an airtight container. Lasts up to 5 days. Just make sure it’s completely cool before you cover it. Otherwise condensation makes it soggy.

    Freezing is smart too.

    Cool the bread completely. Skip the glaze for now. Wrap it tight in plastic wrap. Then into a freezer bag. Squeeze out all the air you can.

    It’ll keep for 3 months easy.

    Ready to eat it? Let it thaw in the fridge overnight. Bring it to room temperature. Add fresh glaze. Perfect.

    Recipe Card

    Lemon Poppy Seed Bread with Glaze

    Prep Time: 10 minutes | Cook Time: 50 minutes | Total Time: 1 hour
    Servings: 12 slices | Difficulty: Easy

    Ingredients

    IngredientQuantityNotes
    Whole or low-fat milk¼ cup (60 mL)Room temperature
    Poppy seeds2 TablespoonsFresh, not expired
    All-purpose flour2 cups (250 g)Spooned and leveled
    Baking powder2 teaspoonsCheck freshness
    Salt½ teaspoonFine sea salt
    Fresh lemon zest2 TablespoonsAbout 2 lemons
    Large eggs3Room temperature
    Granulated sugar¾ cup (150 g)White sugar
    Unsalted butter½ cup (113 g)Melted and cooled
    Fresh lemon juice2 TablespoonsFreshly squeezed
    Almond extract½ teaspoonOr vanilla extract
    Sour cream½ cup (120 g)Full-fat, room temp
    For the Glaze:
    Confectioners’ sugar¼ cup (30 g)Sifted if lumpy
    Fresh lemon juice1-2 TablespoonsFor desired consistency

    Instructions

    1. Whisk together milk and poppy seeds in a small bowl. Let sit for 15 minutes to soften the seeds.
    2. Preheat your oven to 350°F. Line an 8½×4½-inch loaf pan with parchment paper, leaving overhang on the sides.
    3. Whisk flour, baking powder, and salt in a medium bowl. Set aside.
    4. In a large bowl, combine sugar and lemon zest. Rub between your fingers for 30 seconds to release the oils.
    5. Add eggs to the lemon sugar and whisk until smooth. Mix in melted butter, lemon juice, and almond extract.
    6. Add sour cream and the poppy seed-milk mixture to the wet ingredients. Whisk until thoroughly combined.
    7. Pour the dry ingredients into the wet ingredients. Fold gently with a spatula until just combined. Don’t overmix.
    8. Transfer batter to the prepared pan and smooth the top.
    9. Bake for 45-50 minutes, or until a toothpick inserted in the center comes out with minimal crumbs.
    10. Cool in the pan for 10 minutes, then use the parchment to lift the bread out. Cool completely on a wire rack.
    11. For the glaze: Whisk confectioners’ sugar with 1 tablespoon lemon juice. Add more juice for a thinner glaze.
    12. Pour glaze over the cooled bread. Let set for 5 minutes before slicing.
    lemon poppy seed bread

    Questions you might have

    Can I make this ahead?

    Yes. It stays fresh for 5 days at room temperature if stored right. Or bake it and freeze it without the glaze. Add fresh glaze when you’re ready to serve. Makes entertaining so much easier.

    What’s the best way to zest a lemon?

    Microplane or fine grater. Just get the bright yellow part. That white pith underneath? Bitter as can be. And zest before you juice—whole lemons are way easier to work with.

    My bread came out dry. What happened?

    Usually? Too much flour. Spoon it into your measuring cup. Level it off. Don’t pack it down. Also check your oven—every one runs different. Start checking at 45 minutes.

    Can I swap out the poppy seeds?

    Absolutely. Chia seeds work great. Black sesame seeds give you a different flavor. Or skip the seeds entirely. Still tastes amazing.

    Is that crack on top bad?

    Not even a little bit. It’s actually a good sign. As the bread bakes, it rises and expands. The surface sets first. Then the center keeps pushing up and—crack. Means your bread rose perfectly.

    The bright lemon flavor in this bread is addictive. Each slice hits that sweet spot between sweet and tangy. Those poppy seeds add just the right texture. Plain or glazed, this bread’s about to become your new favorite thing to bake.

    Lemon Poppy Seed Bread with Glaze

    Lemon Poppy Seed Bread with Glaze

    Tender, moist lemon poppy seed bread with bright citrus flavor and a sweet glaze. Simple ingredients and beginner-friendly recipe ready in just 1 hour.
    Prep Time 10 minutes
    Cook Time 50 minutes
    Total Time 1 hour
    Servings: 12 slices
    Course: Breakfast, Dessert
    Cuisine: American

    Ingredients
      

    For the Bread
    • 1/4 cup whole or low-fat milk room temperature
    • 2 tablespoons poppy seeds fresh, not expired
    • 2 cups all-purpose flour spooned and leveled
    • 2 teaspoons baking powder check freshness
    • 1/2 teaspoon salt fine sea salt
    • 2 tablespoons fresh lemon zest about 2 lemons
    • 3 large eggs room temperature
    • 3/4 cup granulated sugar white sugar
    • 1/2 cup unsalted butter melted and cooled
    • 2 tablespoons fresh lemon juice freshly squeezed
    • 1/2 teaspoon almond extract or vanilla extract
    • 1/2 cup sour cream full-fat, room temperature
    For the Glaze
    • 1/4 cup confectioners’ sugar sifted if lumpy
    • 1-2 tablespoons fresh lemon juice for desired consistency

    Method
     

    1. Whisk together milk and poppy seeds in a small bowl. Let sit for 15 minutes to soften the seeds.
    2. Preheat your oven to 350°F. Line an 8½×4½-inch loaf pan with parchment paper, leaving overhang on the sides.
    3. Whisk flour, baking powder, and salt in a medium bowl. Set aside.
    4. In a large bowl, combine sugar and lemon zest. Rub between your fingers for 30 seconds to release the oils.
    5. Add eggs to the lemon sugar and whisk until smooth. Mix in melted butter, lemon juice, and almond extract.
    6. Add sour cream and the poppy seed-milk mixture to the wet ingredients. Whisk until thoroughly combined.
    7. Pour the dry ingredients into the wet ingredients. Fold gently with a spatula until just combined. Don’t overmix.
    8. Transfer batter to the prepared pan and smooth the top.
    9. Bake for 45-50 minutes, or until a toothpick inserted in the center comes out with minimal crumbs.
    10. Cool in the pan for 10 minutes, then use the parchment to lift the bread out. Cool completely on a wire rack.
    11. For the glaze: Whisk confectioners’ sugar with 1 tablespoon lemon juice. Add more juice for a thinner glaze.
    12. Pour glaze over the cooled bread. Let set for 5 minutes before slicing.

    Notes

    Store in an airtight container at room temperature for up to 5 days. For freezing, wrap cooled bread (without glaze) tightly in plastic wrap and freeze for up to 3 months. Thaw overnight in the fridge and add fresh glaze before serving.
    For muffins: Fill a 12-cup tin and bake at 400°F for 16-18 minutes.
    For mini loaves: Use two 5×3 inch pans and bake for about 30 minutes.
  • Easy Vegan Cinnamon Buns with Maple Glaze Recipe

    Easy Vegan Cinnamon Buns with Maple Glaze Recipe

    You know that moment when cinnamon buns come out of the oven?

    That warm, spiced smell that wraps around your whole kitchen like a hug?

    Yeah. That’s what we’re making today.

    And here’s the best part – these are completely vegan. No dairy. No eggs. Just soft, pillowy buns that’ll make you wonder why you ever bought the store-bought kind.

    I’ve made these so many times I could probably do it in my sleep. And I’m going to show you exactly how I do it.

    Recipe Timing:
    Prep Time: 15 minutes | Cook Time: 20 minutes | Rising Time: 2 hours | Total Time: 2 hours 35 minutes
    Servings: 12 buns | Difficulty: Moderate


    My Take on Sticky Buns

    Let me be honest with you.

    Traditional sticky buns? The ones from Pennsylvania that everyone raves about?

    They’re baked upside-down with nuts and caramel, then you flip them over and… well, they look kind of messy. Squashed. Not Instagram-worthy at all.

    So I did something different.

    I made classic swirled cinnamon rolls and then drowned them in this incredible maple glaze. The spirals stay gorgeous. The glaze soaks in and keeps everything moist. And they actually look as good as they taste.

    Win-win-win.

    vegan cinnamon buns

    Why This Recipe Works

    Look, I’m all about keeping things simple.

    You don’t need fancy equipment. No bread machine. No special ingredients you can only find at that one store across town.

    Everything goes into one bowl. Less cleanup. More time for eating warm cinnamon buns.

    The dough? Super forgiving.

    Even if this is your first time making yeast bread, you’ve got this. I’ll walk you through the whole thing. Step by step. No confusing baker talk.

    What You’ll Actually Need

    Let me break this down into three parts:

    The Dough

    This is where the magic happens. You’re using stuff you probably already have:

    All-purpose flour – This creates that perfect soft texture we’re after.

    Plant-based milk – I use oat or soy. Just warm it up a bit. Not hot. Warm.

    Vegan butter – This is what makes these buns rich and tender. Room temperature is key here.

    Sugar – Just a touch. This feeds the yeast so they can do their thing.

    Instant yeast – No activation needed. Just dump it in.

    Cinnamon – Even in the dough itself. Because why not?

    The Filling

    This part is beautifully simple:

    Melted vegan butter. Brown sugar. More cinnamon.

    That’s it.

    I don’t hold back on the filling. That’s what makes these buns special.

    The Maple Glaze

    This is what takes good buns and makes them absolutely incredible.

    Pure maple syrup – Don’t cheap out here. Get the real stuff.

    A bit of sugar – Helps thicken everything up.

    Coconut cream (optional) – Want it extra luxurious? Add this.

    vegan cinnamon buns

    Can I Swap Things Out?

    Short answer? Yes.

    Here’s what I’ve tested:

    Flour alternatives:

    • White spelt works
    • Whole wheat works
    • Both will make denser buns (still good, just heartier)

    Gluten-free? I haven’t had luck with it. But different brands behave differently, so maybe yours will work.

    Out of vegan butter?

    Oil works. Your buns won’t be quite as fluffy. But they’ll still taste good.

    Sugar swaps:

    Coconut sugar works throughout the whole recipe. It adds this nice caramel-y flavor.

    For the glaze, agave or golden syrup can replace the maple syrup.

    Your Complete Shopping List

    Here’s everything laid out:

    IngredientQuantityWhat It DoesImportant Notes
    All-purpose flour3¼ cups (405g)Creates the bun structureGrab extra for dusting
    Plant-based milk1 cup (250g)Brings dough togetherShould be warm, not hot
    Vegan butter½ cup (115g)Makes buns richMust be room temp
    Granulated sugar3 tbsp (40g)Feeds the yeastCoconut sugar works too
    Instant yeast1 tbsp (9g)Makes buns riseHas to be instant type
    Ground cinnamon1 tspAdds warmthWe’ll use more later
    Salt1 pinchBrings out flavorSkip if your butter’s salted
    Vegan butter (melted)2 tbsp (30g)Goes on doughFor brushing
    Brown sugar¼ cup (50g)Sweetens fillingPack it down when measuring
    Ground cinnamon1 tbspMain filling flavorThis is important
    Maple syrup¼ cup (85g)Glaze basePure maple is best
    Granulated sugar¼ cup (50g)Thickens glazeHelps it stick
    Vegan butter1 tbsp (15g)Makes glaze glossyFinal touch
    Coconut cream1 tbsp (15g)Extra richnessOptional but amazing

    Let’s Make Some Buns

    Step 1: The Dough

    First things first.

    Get everything out and ready. Trust me on this. When you’re in the middle of kneading, you don’t want to be hunting for the cinnamon.

    Dump your flour, warm milk, room-temp butter, sugar, yeast, cinnamon, and salt into a big mixing bowl.

    Got a stand mixer? Use it.

    Don’t have one? A wooden spoon works just fine. Your arm might get tired, but you’ll survive.

    Mix it all together.

    It’ll look shaggy at first. That’s normal.

    Now knead for 5-7 minutes.

    You’re looking for smooth, elastic dough. When you poke it, it should spring back. It should feel a little tacky. But not wet and sticky.

    vegan cinnamon buns

    Here’s What I Learned the Hard Way

    Every flour brand is different.

    Some soak up more liquid. Some need less.

    So your dough might need tweaking.

    Too dry and crumbly?

    Add milk. One tablespoon at a time. Work it in before adding more.

    The dough will fight you at first. But it’ll come around.

    Too wet and sticky?

    Sprinkle in flour. Gradually. Just until it stops sticking to the bowl.

    Step 2: First Rise

    Move your dough to a clean bowl. Grease it a little first.

    Cover with a damp kitchen towel.

    Why damp? It stops the dough from getting a crusty skin on top.

    Now find the warmest spot in your house.

    My favorites:

    • Oven with just the light on
    • Sunny window (not direct sun though)
    • Near a radiator in winter

    Let it sit for at least an hour.

    It needs to double in size.

    Cold kitchen? Might take 90 minutes.

    Be patient. Don’t rush this.

    If it’s been an hour and nothing’s happening?

    Move it somewhere warmer. Temperature is everything with yeast.

    Step 3: Shape Time

    Punch down your risen dough. Gently.

    Turn it out onto a floured surface. Flour your rolling pin too.

    Roll it into a rectangle. Roughly 16 by 12 inches.

    Try to keep it even.

    Now the fun part starts.

    Brush that melted butter everywhere. And I mean everywhere. Right to the edges.

    Why? Because every single bite deserves to be good.

    Mix your brown sugar and cinnamon in a small bowl.

    Sprinkle it over the butter. Generously.

    Now use your fingers. Press it gently into the butter.

    This stops it from falling out when you roll everything up.

    Starting from the long edge near you, roll the dough tight.

    Keep the tension even. You want a nice compact log.

    vegan cinnamon buns

    Cutting Your Rolls

    Here’s my trick:

    Use a sharp knife. Or unflavored dental floss.

    (Dental floss is honestly better. It doesn’t squash the rolls.)

    Mark the halfway point first. Then quarters.

    This gives you even portions.

    Cut twelve pieces total.

    Grease your 9×13 inch pan.

    Now arrange your rolls. You’ve got options here:

    Close together? You’ll get soft, pillowy edges.

    Spaced apart? Slightly crispier sides.

    Both are good. Your choice.

    Cover with a towel.

    Let them rise another hour. They should get puffy. Almost doubled again.

    Step 4: Bake

    When you’ve got about 15 minutes left on that second rise?

    Preheat your oven to 350°F (180°C).

    Bake for 15-20 minutes.

    You’re looking for light golden color on top.

    Want to test if they’re done? Stick a skewer into a center bun. Should come out clean.

    The Glaze

    While those buns are baking, make your glaze.

    Throw maple syrup, sugar, butter, and coconut cream (if using) into a small saucepan.

    Whisk over low heat.

    Everything should melt together and thicken up a bit. It’ll coat the back of a spoon when it’s ready.

    Pull your buns out of the oven.

    Right away – drizzle that warm glaze over them.

    The heat helps it soak in. It’s beautiful.

    Wait 5-10 minutes before digging in.

    I know it’s hard. But warm cinnamon buns are worth the wait.

    What About Leftovers?

    These taste best fresh.

    But leftovers? Still great.

    Keep them in an airtight container:

    • Room temperature: 1-2 days
    • Fridge: 3-4 days

    Always reheat before eating.

    Ten seconds in the microwave brings back that just-baked texture.


    My Best Tips

    Let me share what I’ve learned from making these about a hundred times:

    Temperature Is Everything

    Your milk should be warm. Not hot.

    Aim for 100-110°F.

    Too hot? You’ll kill the yeast.

    Too cold? Everything slows way down.

    Don’t Skip Rising Time

    I get it. Waiting is annoying.

    But this step matters. A lot.

    Underproofed dough = dense, sad buns.

    Properly risen dough = fluffy, amazing buns.

    Roll Tight (But Not Too Tight)

    You want a tight roll for those pretty swirls.

    But don’t go crazy. Too aggressive and you’ll squeeze all the filling out.

    The Dental Floss Trick

    Seriously. Try this.

    Slide the floss under your dough log. Cross the ends over the top. Pull.

    Clean cuts every time. No squashed buns.

    vegan cinnamon buns

    Make Them Ahead

    I do this all the time for weekend brunch.

    After you shape the buns, cover the pan tight with plastic wrap.

    Stick it in the fridge overnight.

    Skip that second rise.

    Next morning, pull them out. Let them sit at room temp for 30-45 minutes while your oven heats up.

    Then bake.

    Want to Freeze Them?

    You can freeze unbaked buns.

    Shape them. Freeze on a tray until solid. Transfer to freezer bags.

    When you’re ready to bake:

    • Thaw overnight in the fridge
    • Do the final rise
    • Bake as usual

    When Things Go Wrong

    Because sometimes they do. Here’s how to fix it:

    Dough Won’t Rise

    Check your yeast first. Is it expired?

    Old yeast = dead yeast = no rising.

    Also make sure your spot is actually warm enough.

    Buns Came Out Dense

    Usually this means:

    • You didn’t knead enough
    • You didn’t let it rise long enough
    • Both

    The dough needs time to develop. Don’t rush it.

    Filling Leaked Out

    Two reasons this happens:

    You didn’t press the cinnamon sugar into the butter enough.

    Or your roll wasn’t tight enough.

    Glaze Too Thin

    Let it simmer longer.

    The liquid needs to evaporate. The sugar needs time to dissolve and thicken things up.


    Questions People Always Ask Me

    Can I use active dry yeast instead of instant?

    Yep. But you’ll need to activate it first.

    Mix it with your warm milk and a pinch of sugar. Wait 10 minutes for it to get foamy.

    Then add it to your other ingredients.

    Oh, and use about 1⅓ tablespoons. Active dry isn’t as strong as instant.

    How do I reheat these?

    For one bun: Microwave for 10-15 seconds.

    For several: Wrap in foil. Warm in a 300°F oven for 10 minutes.

    This brings back that soft texture without drying them out.

    Can these be frozen?

    Absolutely.

    Bake them completely. Let them cool. Don’t add the glaze yet.

    Wrap each one in plastic wrap. Put them in freezer bags.

    They’ll keep for 3 months.

    To eat: Thaw at room temp. Warm them up. Then add your glaze.

    Why aren’t my buns fluffy?

    Could be a few things:

    • Your yeast was old
    • You didn’t knead enough
    • You rushed the rising time
    • You added too much flour

    Make sure your yeast is fresh. And give the dough the time it needs.

    Can I add nuts or raisins?

    Go for it!

    Chopped pecans or walnuts work great. Sprinkle them over the cinnamon sugar before rolling.

    Raisins too.

    Just don’t overdo it. You still need to be able to roll the dough.


    Now go make some buns. Your kitchen is about to smell amazing.

    Vegan Cinnamon Buns with Maple Glaze

    Easy Vegan Cinnamon Buns with Maple Glaze

    Soft, pillowy vegan cinnamon buns with a rich maple glaze. Made with simple ingredients and a foolproof method that works every time.
    Prep Time 15 minutes
    Cook Time 20 minutes
    Rising Time 2 hours
    Total Time 2 hours 35 minutes
    Servings: 12 buns
    Course: Breakfast, Dessert
    Cuisine: American

    Ingredients
      

    The Dough
    • 3 1/4 cups all-purpose flour 405g, plus extra for dusting
    • 1 cup plant-based milk 250g, warm (oat or soy)
    • 1/2 cup vegan butter 115g, room temperature
    • 3 tbsp granulated sugar 40g
    • 1 tbsp instant yeast 9g
    • 1 tsp ground cinnamon
    • 1 pinch salt skip if butter is salted
    The Filling
    • 2 tbsp vegan butter 30g, melted
    • 1/4 cup brown sugar 50g, packed
    • 1 tbsp ground cinnamon
    The Maple Glaze
    • 1/4 cup pure maple syrup 85g
    • 1/4 cup granulated sugar 50g
    • 1 tbsp vegan butter 15g
    • 1 tbsp coconut cream 15g, optional

    Method
     

    1. In a large mixing bowl, combine flour, warm plant-based milk, room temperature vegan butter, sugar, instant yeast, cinnamon, and salt. Mix with a stand mixer or wooden spoon until combined.
    2. Knead the dough for 5-7 minutes until smooth and elastic. The dough should spring back when poked and feel slightly tacky but not wet. Add milk (1 tablespoon at a time) if too dry, or flour if too sticky.
    3. Transfer dough to a lightly greased bowl, cover with a damp kitchen towel, and place in a warm spot. Let rise for at least 1 hour (up to 90 minutes in cold kitchens) until doubled in size.
    4. Gently punch down the risen dough. Turn out onto a floured surface and roll into a 16×12 inch rectangle using a floured rolling pin.
    5. Brush melted vegan butter evenly over the entire surface, right to the edges. Mix brown sugar and cinnamon in a small bowl, then sprinkle generously over the butter. Press gently with fingers to help it stick.
    6. Starting from the long edge nearest you, tightly roll the dough into a log, keeping even tension throughout.
    7. Using a sharp knife or unflavored dental floss, cut the log into 12 equal pieces. Arrange in a greased 9×13 inch pan, either close together for soft edges or spaced apart for slightly crispier sides.
    8. Cover with a towel and let rise for another hour until puffy and nearly doubled.
    9. Preheat oven to 350°F (180°C) during the last 15 minutes of rising time.
    10. Bake for 15-20 minutes until light golden on top. Test doneness by inserting a skewer into a center bun – it should come out clean.
    11. While buns bake, make the glaze: Combine maple syrup, sugar, vegan butter, and coconut cream (if using) in a small saucepan. Whisk over low heat until melted and thickened enough to coat the back of a spoon.
    12. Remove buns from oven and immediately drizzle warm glaze over them. Let rest 5-10 minutes before serving.

    Notes

    Storage: Store in an airtight container at room temperature for 1-2 days, or refrigerate for 3-4 days. Reheat for 10-15 seconds in the microwave.
    Make Ahead: After shaping buns, cover tightly with plastic wrap and refrigerate overnight. Next morning, let sit at room temperature for 30-45 minutes, then bake as directed.
    Freezing: Freeze unbaked shaped buns on a tray until solid, then transfer to freezer bags. To bake: thaw overnight in fridge, do final rise, then bake. Or freeze baked buns (without glaze) for up to 3 months – thaw, warm, then add fresh glaze.
    Substitutions: White spelt or whole wheat flour works but makes denser buns. Coconut sugar can replace all sugars. Oil can replace butter but buns won’t be as fluffy. Active dry yeast works – use 1⅓ tbsp and activate in warm milk with sugar for 10 minutes first.